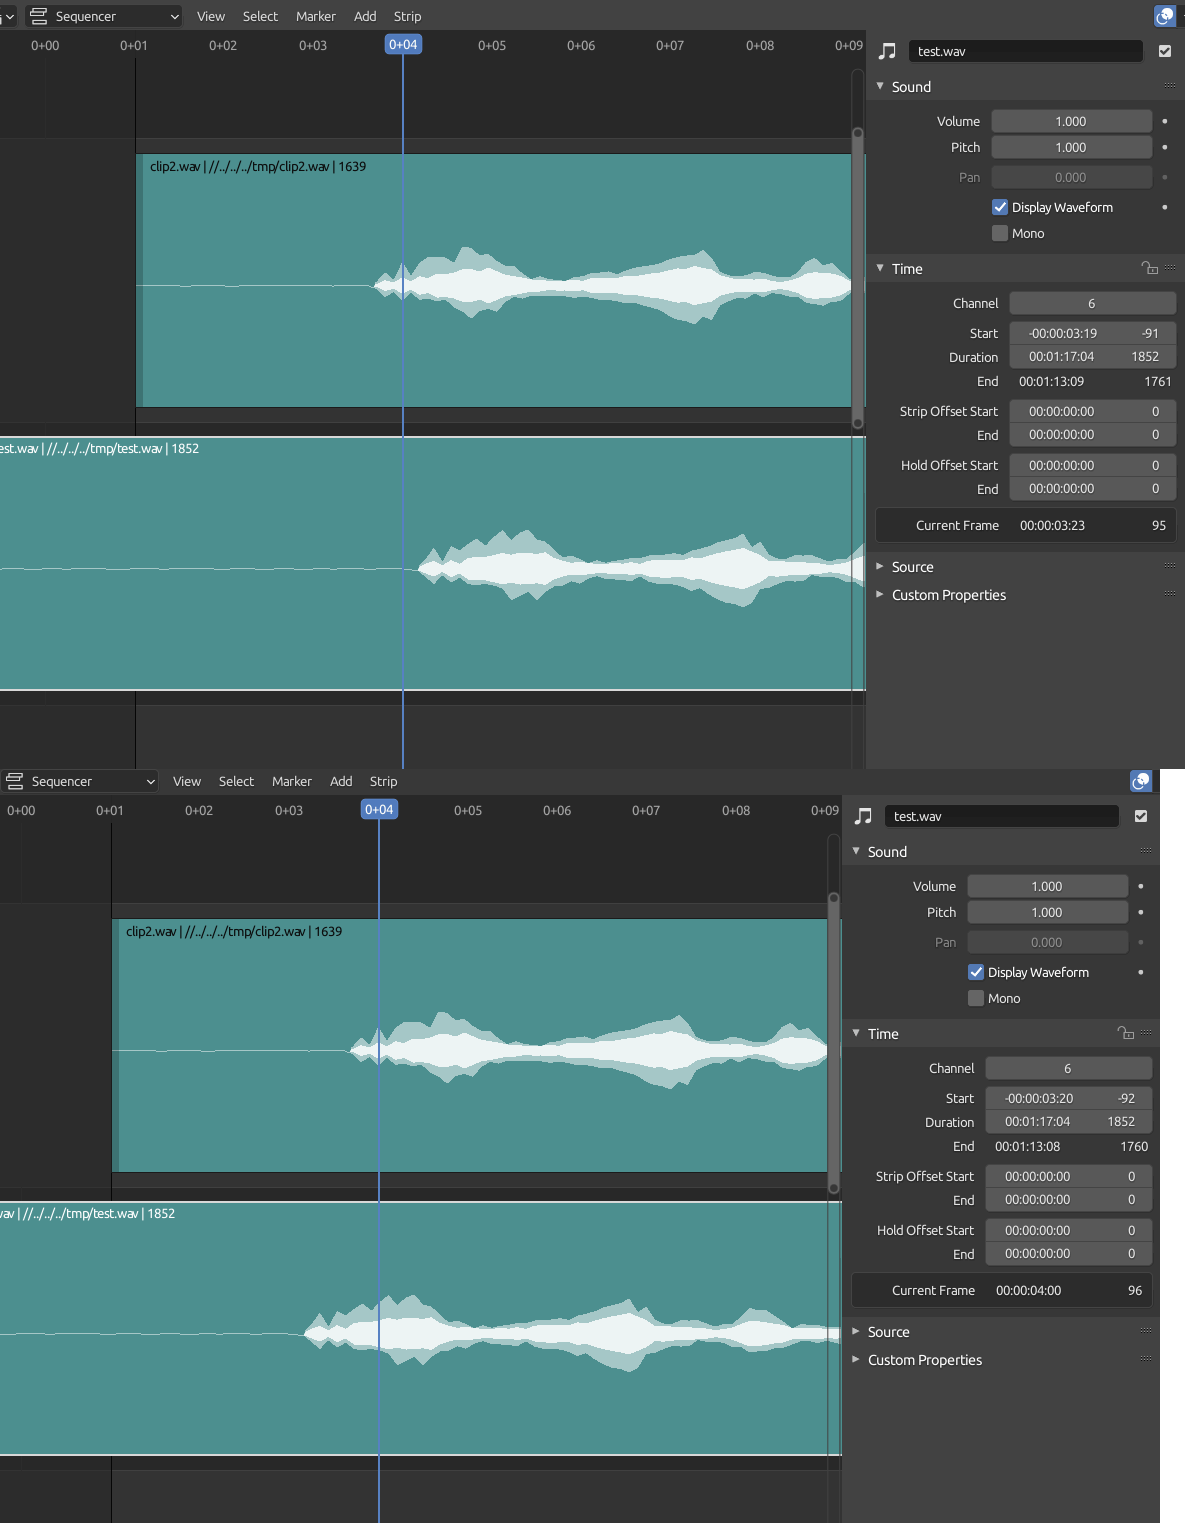
Thread #1021529 | Image & Video Expansion | Click to Play

File: Blender_4.5-splash_screen.png (557.2 KB)

557.2 KB PNG
Previous: >>1016084
446 RepliesView Thread
 Showing all 446 replies.
>>
>>
>>
>>
>>
>>
>>
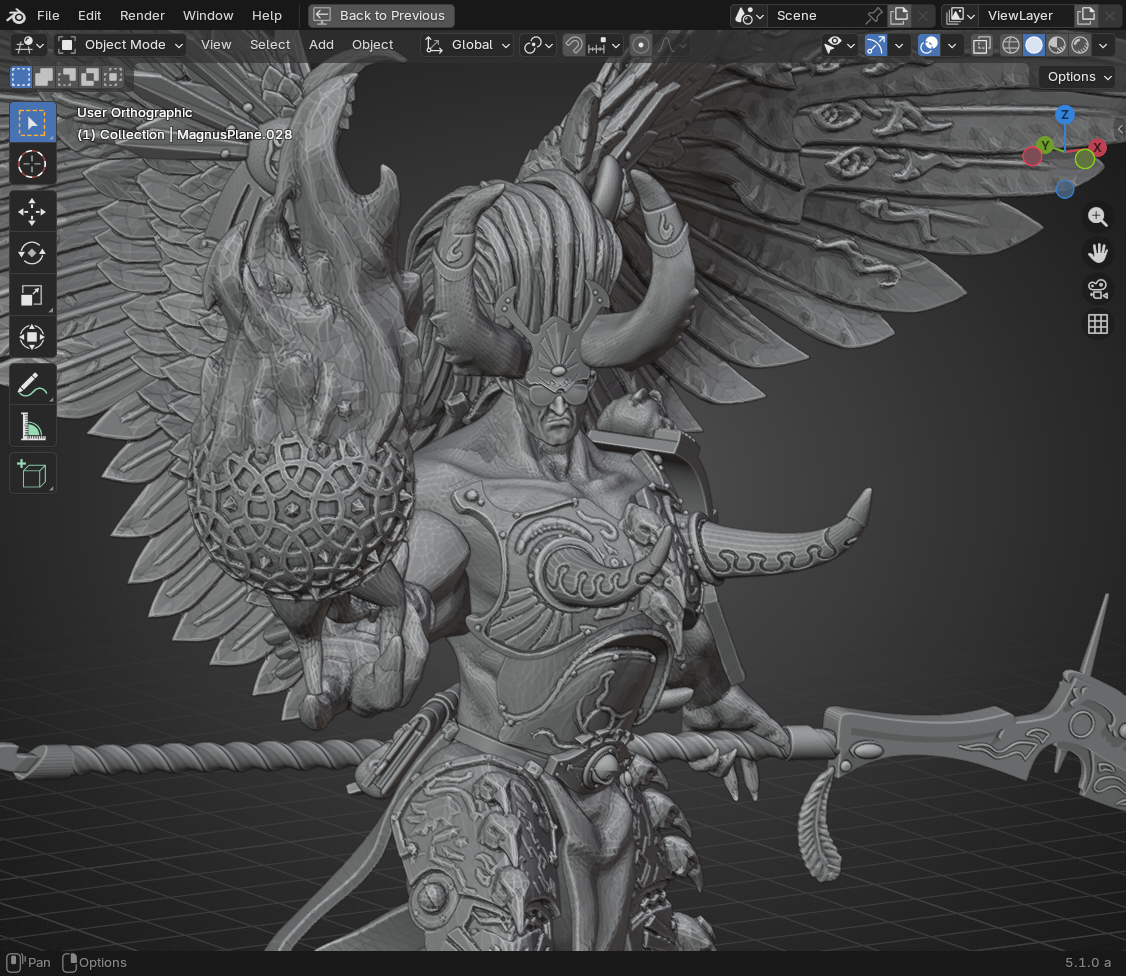
File: Screenshot_2025-11-06_20-55-29.png (795.9 KB)
795.9 KB PNG
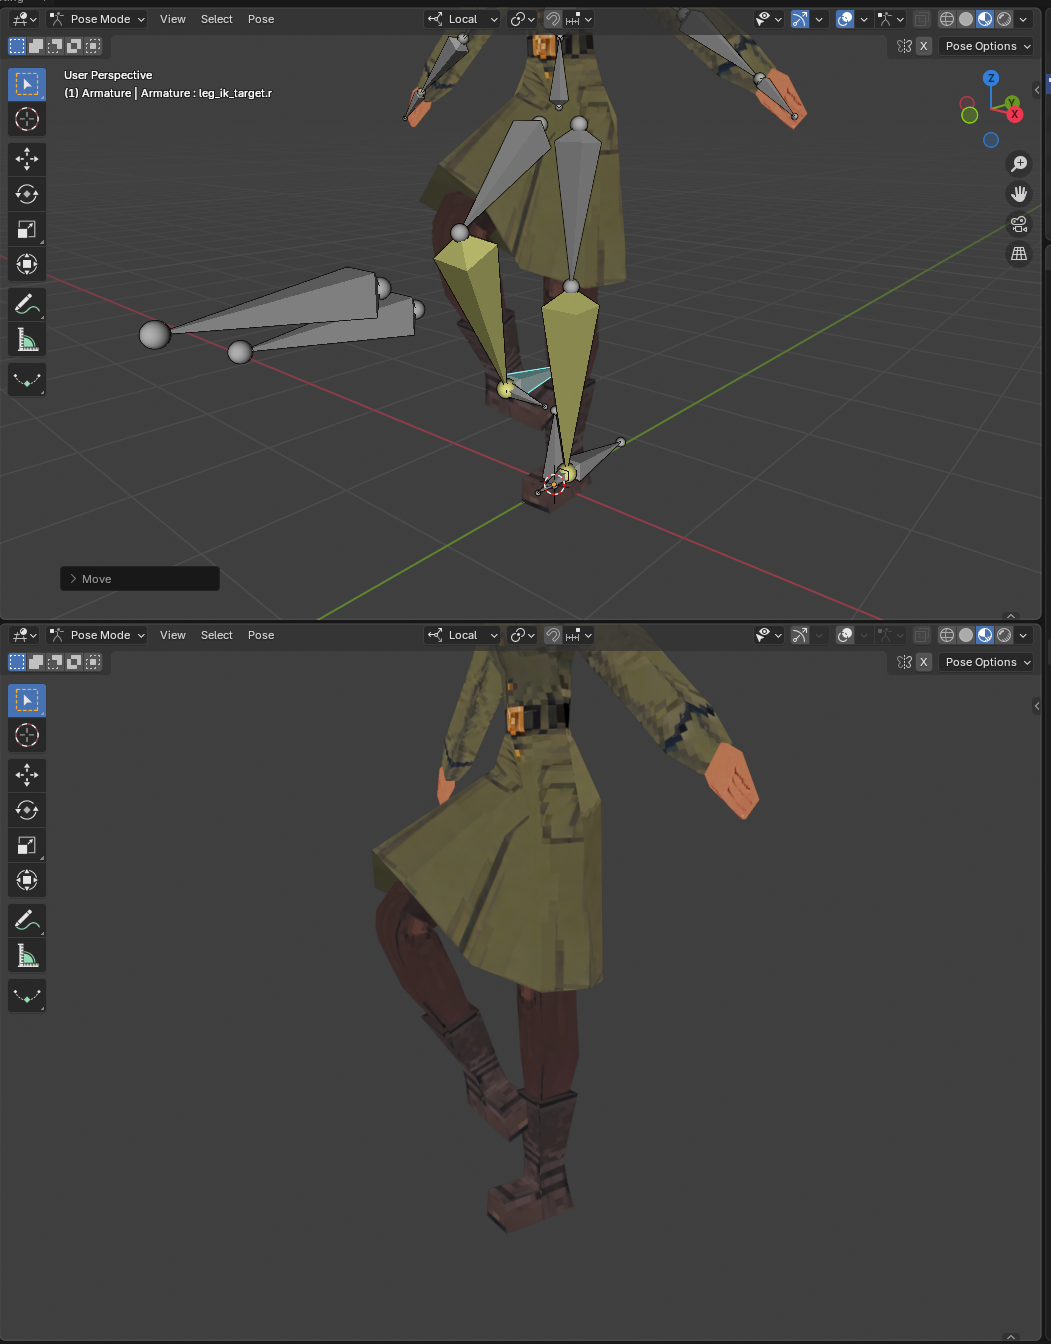
Is there something I missing as to why IK always ends up not working right?
Its either the bones point in the right direction, but they're rotated to the side like pic related, or the bones point in the wrong direction but the rotated correctly.
It happens almost everytime I make an armature and I can't figure it out.
>>
File: Screenshot_2025-11-06_21-00-16.png (902.6 KB)

902.6 KB PNG
>>1021565
changing the pole angle, its bending in the wrong direction but facing the right way
>>
>>
>>
>>
>>
File: blender.png (196.1 KB)

196.1 KB PNG
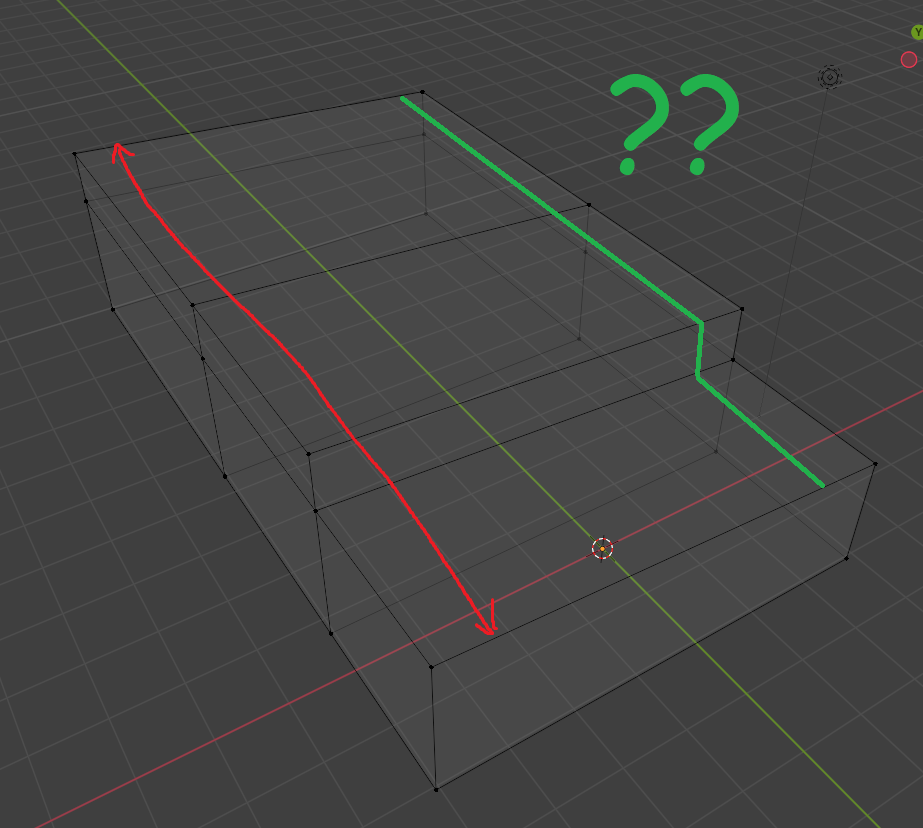
how the fuck do I use knife tool so it would snap to grid? Google says it's just impossible and gives me some retarded workarounds that don't work. I hate this program like you wouldn't believe.
I just need to make a cut at an exact place but I can't use loop cut and move newly created vertices because face is at an angle. Fuck do I do? Pic rel is where I want to make a cut
>>
>>1021645
The way I would do it is:
- Select all the edges you want to cut, then right click and choose subdivide.
- Add a plane (can be in the object or a separate object) and align it to the grid line you want the vertices to snap to.
- Turn on vertex snapping (face), select the vertices you created, and double press g to slide them to the plane. You may have to slide them individually because slide doesn't always like to behave.
>>
File: 1761272534544406.jpg (172.3 KB)

172.3 KB JPG
>>1021657
>do 200 steps of something
>blendlet's insane amount of coping around
NURBS chads, we win
>>
>>
>>
>>1021529
How’s the video editing side of Blender?
And what are the best Blender video editing tutorials worth my time to look at?
I know it might be the overshadowed function because the 3d related sides are more popular.
>>
File: 1762615622750044.png (237.4 KB)
237.4 KB PNG
>>1021645
report the bug to the blender developers and move on with your life knowing it'll be fixed in about 10 years from now
>>
>>1021645
I'm not sure if you have addons to do that >nsolve, hardops, half knife (free).
To snap to the grid with the knife the only solution now with vanilla blender is to use knife project, if you think it is needed you could also try to contact the modeling module via chat.blender.org , they hired that Turk from the GSOC and he could be interested, you also have https://blender.community/c/rightclickselect/, the Chink from the sculpt module uses it and he could be interested too.
>>
File: images.jpg (33.4 KB)

33.4 KB JPG
>>1021698
>blendlets need 200877 addons to do one simple operation
>>
>>
>>
I'm starting with blender and sculpting in particular.
I have read that it's good to have a drawing tablet for sculpting, but I seem to have misplaced my old shitty Wacom I used for online teaching.
Would you recommend buying a tablet or is my regular trackball more than enough?
>>
File: images(1).jpg (45.5 KB)

45.5 KB JPG
>>1021702
>blendlet problems
>>
>>
>>
>>
File: 1761936492587980.jpg (58.8 KB)

58.8 KB JPG
>XPBD still not out
>>
File: 1758873545115892.png (196.1 KB)
196.1 KB PNG
How do I get rid of this gap?
I just print STLs and so want a quick solution
>>
>>
>>
>>
>>
>>1021753
I take it you barely know how to use blender? The model's already been decimated so that complicates things
The simplest way would be to join, move the parts so they overlap, remesh with a small voxel size, sculpt and smooth the joint, decimate
Hopefully you don't lose too much details
>>
>>
>>
>>
>>
>>
>>1021779
It probably needs a much cleaner UI/UX before being official. It looks more complicated than it is and that scared me away from it for a while. The workflow isn't immediately obvious with the menu designs/drop downs so it's not friendly to experimenting. It's full of features but most artists who are handpainting textures just want a layer stack like in a digital painting program.
This is the best tutorial I'm aware of but it's not that professional and is missing some parts like using the masks for non-destructive painting, so you need the second video.
https://www.youtube.com/watch?v=8_apXIn0g5w
https://www.youtube.com/watch?v=6UBSmHdO8gw
>>

>>1021782
Yes, the interface is a bit shitty, one of the things that lacks to me is the integration with other programs like Photoshop or Krita, I'm not sure if you can save layer groups as assets but that would be nice too.
>is missing some parts like using the masks for non-destructive painting
this is from the download page
>>
>>
>>1021783
I meant the tutorial video I linked misses out on showing some of the non-destructive features, not that ucu is missing anything.
I've not tried it, but there is a way to do live link with external programs
https://youtu.be/D90UpxA-VDw?t=10
https://extensions.blender.org/add-ons/auto-reload/
>>
>>
>>
>>
>>
>>
>>
>>1021937
There are a ton of features to look forward to even if none of them are interesting by themselves. Those geo node modifiers, new sky texture, adaptive subdivision, compositing nodes as assets, uv sync selection updates, automatic bounding box for lattic, color management/working space changes, the list goes on
>>
>>
>>1021937
It doesn't add much for me, maybe next update will be better for me
https://developer.blender.org/docs/release_notes/5.0/
The fix to sculpt mode radial symmetry is welcome but not life-changing
It looks like the shapekeys menu is going to be better, that's nice, it'd be nice if they improved the attributes menu too
Compositor improvement is always good even if I don't do that part, I think the EXR channel thing is neat too (you should check out https://youtu.be/KQ66j6DJ6Lo if you composite in blender)
New improved matcaps, nice, maybe they're better than my custom matcaps
New modifiers are nice, especially the array and scatter, most of the geo nodes and volume stuff flies over my head but someone will probably make a toolkit I can use
I'll decide how I feel about the UI changes when I switch to 5.0
>>
full aces 2.0 support + aces rendering space is a very welcome and very fundamental change. it should be the default and will impact most people who use cycles going forward.
adaptive subdiv is also very nice and the multi-bounce sss is a good step in the right direction to fixing cycles' awful subsurface implementation.
>>
>>
>>

>>
>>
>>
>>
>>
>>1021942
I do not care at all about tablet port.
The geometry node backed modifiers are instantly usable by beginners and experts alike which makes iteration and modeling much faster. It's the biggest and most accessible change they've made in recent memory.
https://developer.blender.org/docs/release_notes/5.0/modeling/
Out of curiosity, I just checked the 4.0 donut tutorial and it completely removes almost 60 minutes of the geometry nodes sprinkle section.
>>1021946
This, those are huge improvements that you get for free or changing one dropdown like Rec. 2020 in the working space dropdown
Dark shadow artifacts disappearing with SSS
https://developer.blender.org/docs/release_notes/5.0/cycles/#subsurfac e-scattering
The multi-bounce sky texture
https://youtu.be/cWd-TPvvXE0?t=628
https://youtu.be/2IuOUDwZdiw?t=604
Thin film on metals (anodized metals too)
https://developer.blender.org/docs/release_notes/5.0/cycles/#metallic- thin-film
https://www.youtube.com/watch?v=aWXSkXaexo4
Wider working space giving better render results even if you're not pushing crazy colors
https://youtu.be/cWd-TPvvXE0?t=284
https://youtu.be/2IuOUDwZdiw?t=136
>>
>>
>>1021984
>Out of curiosity, I just checked the 4.0 donut tutorial and it completely removes almost 60 minutes of the geometry nodes sprinkle section
I think that's a shame because it was an early introduction to geometry nodes
But I'm an hypocrite because I don't want to create my own node setups
>>
>>1021547
More irrefutable proof that blender is better than maya. Imagine if there was a maya general, if you swapped the letters it would say "gaya meneral", as in gay men. This may seem like some silly wordplay, but the antichrist and the nwo know the power of word magic and puns and use these as tools to penetrate the anus of your mind.
>>
File: -rO1o5uzCOc.jpg (125.6 KB)

125.6 KB JPG
>>1021997
He agrees
>>
File: spacemouse.jpg (389.3 KB)

389.3 KB JPG
Please recommend how to map the buttons on space mouse to replace the keyboard as much as possible.
I'm trying to learn sculpting and will be using space mouse + drawing tablet on Linux (Hyprland).
I have little knowledge about the common keybinds, since my only previous experience is the planetoid and rocket video on 2.8x or around that time and general basic introduction from CGCookie on 4.5.
Could you please list the most common buttons/combos one uses for sculpting and what is the keyboard still used for besides the numbers?
>>
>>1022009
Do yourself a favor and open Blender, start sculpting and figure it out. You're not going to be able to map shortcuts if you don't even know what brushes you use.
The keyboard key you need that's not a brush shortcut is F to resize brush (and Shift+F to change brush strength, Control+F to rotate brush). There's also A and Alt+Q.
I recommend combination shortcuts, like [1] for Draw, Shift+[1] Sharp Draw, Control+[1] for Crease Polish, Alt+[1] for Crease Sharp, etc.
Break them into categories, maybe set the Grab brushes to [1], the Draw brushes to [2], Clay and Inflate to [3], Scrape brushes to [4].
>>
>>
File: FB_IMG_1648750926117.jpg (88.1 KB)
88.1 KB JPG
Is it worth learning to rig? Looking at the Art of Effective Rigging Course, it’ll take me at least half a year to get through it all since it’s basically engineering which fries my brain. Not sure if it’s worth it when things like rigify or other addons exist.
Are blender riggers obselete? Should I drop it or continue?
>>
>>1022037
Do you want to make rigs? Then yes. Otherwise maybe no.
Beyond that, you'll learn a number of workflow tips and tricks that'll greatly accelerate your work with bones in general and come in handy whenever your autorigger doesn't seem to do what you want, or even when it does. Something like rigify won't help you with clothes or appendages, you'll also learn a decent weight painting workflow, corrective bones, a bunch of the obscure constraints, how to easily place bones accurately when setting up the meta rig, etc.
>>
>>
>>
>>
>>
>>
>>
>>
File: cgcookie.png (192.2 KB)

192.2 KB PNG
Where can i learn shaders properly?
I tried cgcookie shader "course" of pic here, but it's absolutely garbage. The woman doing it just reads the blender documentation (which is a technical explanation of a shader) and nothing more. Everyone in the course reviews calls cgcookie out for it and how appalling the quality of the "course" is.
>>
>>
>>
>>
>>
>>1022091
Stylized station has some pretty good tutorials. They are mostly for cartoon/anime styles but they give a good idea of how to build up specific effects in a shader. I'd recommend it even if you want to do realistic shaders.
>>
>>
>>
>>
>>
>>
>>
>>
5.0 is finally here, didn't think it'd make it today with the Cloudflare outage
https://www.blender.org/download/
Recap video
https://www.youtube.com/watch?v=4wEqD-jK0DU
>>1022125
The vulkan backend performs way better, sculpting performance is miles better, there are new geometry nodes backed modifiers
>>
>>
>>
>>
>>
>>
>>
>>1022142
Links for free shit are in board OT, also there's a couple download links in the two aiee threads, look up the archives. Also Mihoyo provides MMD downloads of most of their characters, which you can easily import into Blender
>>
>>
>>
File: 19-11_16-47.png (216.7 KB)

216.7 KB PNG
I think the matcaps are better but I hate them because they're new
Maybe I can get used to them, I'll try them, I'm interested in the green clay that's my favorite for trad sculpting
>>
>>
File: 19-11_17-35.png (78.5 KB)
78.5 KB PNG
>>1022155
If you really want it back you can install it from your 4.5 installation files, matcaps are stored in /datafiles/studiolights/matcaps/
>>
>>
>>
File: file.png (189 KB)
189 KB PNG
https://www.blender.org/download/releases/5-0/
>>
>>1022157
and then ppl will wonder why major projects like movies and triple a games use stable stuff like maya that get a few incremental updates every year. i suppose for the blender tutorial industrial complex having blender change drastically every 18 months is great cuz then people have to constantly refresh their tutorial collections.
>>
>>
>>
>>
>>
>>
There was a youtube tutorial posted a few threads back showing a really shader set up that looked like a painting on a desert landscape or something like that. anyone happen to know what I'm talking about? I can't find anything when looking in youtube
>>
What's a shader node actually? It seems like whatever crazy shit i do with normal maps will export just fine, but if i blend textures or materials it shits the bed. How do i know what it will export properly and what only exists in blender?
>>
>>1022341
A shader is a program that computes the final color (or other attribute) at a given pixel of a given triangle based on the triangle attributes and other scene elements. Essentially, you can see it as a series of math formulas and functions that are executed in sequence.
Since those programs are in their own languages and deal with some pretty complex math and physics concepts, they were abstracted into materials, ie "given those inputs, the formula for the color is this", so you only need to know what inputs to feed into the material. The phong lighting model is an example of an early material shading formula, the Disney principled shader (what 3d people really mean when they say PBR) is a much more recent one.
But actually that approach is very inflexible, cause you may want a material that doesn't conform exactly to those models, so whenever you need another material shading program you need one or more engineers or big nerds to write it. Artists can't write code.
Enter node graphs! the programs are cut up into their components, the shader nodes, high or low level (there's an addition node that'll translate to a "A+B" in the program but there's a principled node too that might result in a couple hundred lines) and so the writing complexity is hidden from the artist. They wire up their nodes, then the program goes over the graph and writes the matching code. So now artists can "draw" code with immediate feedback.
However, the choice of nodes and exactly what kind of code they translate to is dependent on both the surrounding program and the mood of whoever contributed to the node system. Blender or Unity or UE wire up their nodes differently and have different formulas. There's no standard, not even in naming.
So you have to write a graph converter, a titanic, ever-evolving task because the nodes and graphs don't inherently match. On average it's a much more efficient workflow to just rebuild the same materials in each engine's own authoring system.
>>
>>
>>
>>
>>
>>
>>
File: wot.jpg (120 KB)

120 KB JPG
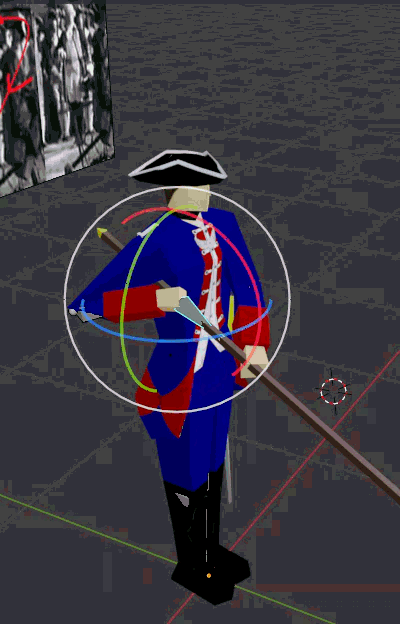
Im making anims in blender here and part of this animation requires this dude to remove his hat for a salute, whats the best way to do this? i can make a separate bone for the hat but then i have to manually input the keyframes for the rest of the animations. is there a way this separate bone can be attached but also be able to move off the head? or is the only solution to hide the hat on the head and add a hat to the hand?
>>
>>1022367
not a blendlet, but I know the answer.
You parent constrain the hat to the head, and the hat to the hand. When he's wearing that hate turn on the head constraint. When the hand picks it up, turn off the head constraint and turn on the hand constraint. When he sets his hat down, turn off both constraints.
Convolute the constraints through other transform nodes as necessary.
>>
>>
>>
>>
>>
>>1022364
Do you have any recs for ways to learn it or just learned it over time?
I tried ages ago in 2.7x and it was complete ass, I remember downloading add-ons to get basic functionality for clips. Now whenver I try to learn motion graphics stuff it's all geometry nodes slop instead of anything like 2D or video editing
>>
>>1022382
>2.7x
In my opinion (as someone who uses it almost daily) was unusable.
VSE became fun and mostly reliable only like 2 years ago. There are still bugs of course but it depends on the version of Blender you're using. For example I've been using a particular release of 4.3 for a long time without switching to newer ones because of a persistent bug that existed before it and after it (up until recently).
>ways to learn it
Mostly learning by doing.
I usually have in mind what the video should roughly look like so I just go for it and whenever there's an issue I look up how to achieve the particular thing I want it to do. After a short while of doing this I know where everything is and usually don't have to look up shit anymore if I'm not doing something new and fancy.
I especially love Blender's VSE for the ability to digest almost anything I throw into its timeline. I can literally just grab something from my file explorer and drop it on the video timeline. Other software I've tried had some weird project container where you have to put stuff first and then be able to use it AND they usually also are really picky about formats. For example in the VSE I can just plop WEBMs I found in a thread or even GIFs. Pics, too. It eats almost anything.
When you're done you could even directly render to VP9 WEBM so you could instantly post your result here. I usually render uncompressed though and convert to WEBM later since that way I have finer control about quality/file size.
So yeah, you learn the fastest by dicking and while having fun.
>>
If I wanna create a video with a car driving around for a longer time while the camera follows and also changes to different viewing angles, etc. Would that be possible in blender or should I rebuild the scene in something like unreal?
I'm talking about a video of 10 minutes or so. I imagine setting the path for both car + camera in that length quite time consuming. Also given that the wheels need to roll depending on the speed.
>>
>>
>>
>>
>>
File: 0001-0061.webm (180.8 KB)

180.8 KB WEBM
>>1022392
I'm a big fan of the Milky Highway method of having the road basically be a repeated segment on array/curve modifiers with an animated offset
https://www.youtube.com/watch?v=dSc27JPm3r8
>>
>>1022392
There's a free addon for Blender somewhere that makes car animation quite easy since you can either drive it inside blender and record it or define paths. It also has physics enabled so the car will roll, have suspension etc. You can plopp pretty much any car on the rig and bind the physics to it
>>
>>
>>
File: Image 11-26-25 at 11.32 PM.jpg (442.1 KB)

442.1 KB JPG
>hi anon, time for another donut tutorial. no you can't leave, you have to watch and follow along!
>>
>>
>>
is Substance 3D Painter viable for texturing low poly assets? I'm talking PS1 level
manually painting things in blender is a bit of a pain and I'm a drawlet, and using photos for textures has its limitations
it'd be nice to set up something with procedural edge wear or chipped paint etc without having to mess with a ton of nodes, is all. just not sure if that stuff requires complex geometry
>>
>>
>>
>>
>>
>>
>>
>>
>>
>>
>>
>>
>5.0
>Add subdiv and bevel to a model just to see how it will look
>It bumps the poly count to about +100k
>However Blender shits itself and the performance goes to singe-digit fps
Is it because of my shit topo or is there another reason for that to happen?
>>
>>
>>1022590
>Also kinda depends on what modifiers you have around the subdiv
Just a mirror mod and auto smooth.
I thought that smooth might be the reason, however I just tested these mods without the smooth and the program still chugs.
So I guess my topo is just too shit for blender to handle.
>>
>>
>>
>>
File: Noife.png (300 KB)

300 KB PNG
>>1022602
Pls no bully too hard.
Tris and quads. No ngons as far as I can see.
Prior to that I made a 500k+ model and subdiv + bevel worked fine there.
Also it seems that Blender only chugs when I initialize the modifiers. When I apply them it goes back to normal.
>>
>>
>>
>>
>>1022603
Topo is kinda shit, but high enough that you don't need subdivision.
Try setting the bevel weight of the unmarked corner edges to 1, apply a bevel (only one segment, with limit method 'weight') and add the "weighted normal" modifier. That should already do a good job
>>
>>
>>1022603
Sounds like there's other stuff that's messed up which we're not being told. Also depending on the bevel modifier settings, you might be making ngons with the segments and miter. Usually you want an even number and Arc
This vid has good general subd tips for modeling. In particular 16:20, you want to reduce edges where they have no detail. You should be modeling from subd from the start, after initial block-in. Your base mesh cage should not need that much detail.
https://www.youtube.com/watch?v=XmbttkNF2Zk
>>
I'm sure I'm the 80-billionth person to ask but is there a beginner course that covers doing blender shit for gamedev? Went through the doughnut, checked the Joey Carlino vids, and am going through the CG cookie series. I get the basic basics but I imagine the methodology or workflow for gamedev is different than like making renders for xitter.
I'm gonna poke through warosu and see if someone has already answered this question but just in case I can't find an answer or somebody answers faster than I can find anything I figured I'd ask.
sorry and thanks
>>
File: dsgsdgb.png (201.1 KB)

201.1 KB PNG
>>1022640
>>
>>
>>1022643
I've been taking a look a bit and the ones that I like are:
Game Asset Creation: Modeling & Texture Painting in Blender by Art Studio313
Blender: Stylized character creation for videogames by The Parabox 3D
3DTudor - Blender 4 The Modular and Kitbash Environment Guide
animators pipeline from Blender to engine By Hamish Calthorpe
GameDev.tv - Blender Animation & Rigging - Bring Your Creations To Life by Grant Abbitt
The Gnomon Workshop - Architectural Design for Games using Blender & UE5
Full game character in Blender course - Moth Girl by SpeedChar
FlippedNormals - Sci-Fi Game Environment in Blender & UE4 by Emiel Sleegers
>>
>>1022640
Specifically for rigging, Art of Effective Rigging places some emphasis on keeping the rigs compatible for game engines and it has an extra chapter dedicated specifically to game rigs at the end.
There's also this book
https://www.routledge.com/A-Complete-Guide-to-Character-Rigging-for-Ga mes-Using-Blender/Halac/p/book/9781 032203003
>>
>>1022645
I've found a ucupaint course that could be interesting > Layer Based Texturing In Blender (Ucupaint Course) by FR3NKD, it is mandatory for texturing, to download something to learn hardops could be interesting too, maybe > Blender Bros - Complete Guide to HardOps and Box Cutter OffRoader
>>
>>
>>
>>1022656
I mean, at least they should know stuff like how game engines have low weight count limitations per vertex, bone count might be limited, they can't deal with most modifiers, the size units need to be right for the engine, materials will probably need to be recreated, using the fbx checker is a good idea to see what the result will look like without needing to get it into the engine, and so on.
>>
>>
File: 5465465.png (2.9 MB)

2.9 MB PNG
what's the simplest node setup / method for blending two image textures together with vertex paint?
I'm using cube projection and project from view for my environment work but I need to learn blending, pic related (not mine)
>>
>>
>>
>>
File: Noifes.png (188.8 KB)
188.8 KB PNG
>>1022615
Thanks for the link.
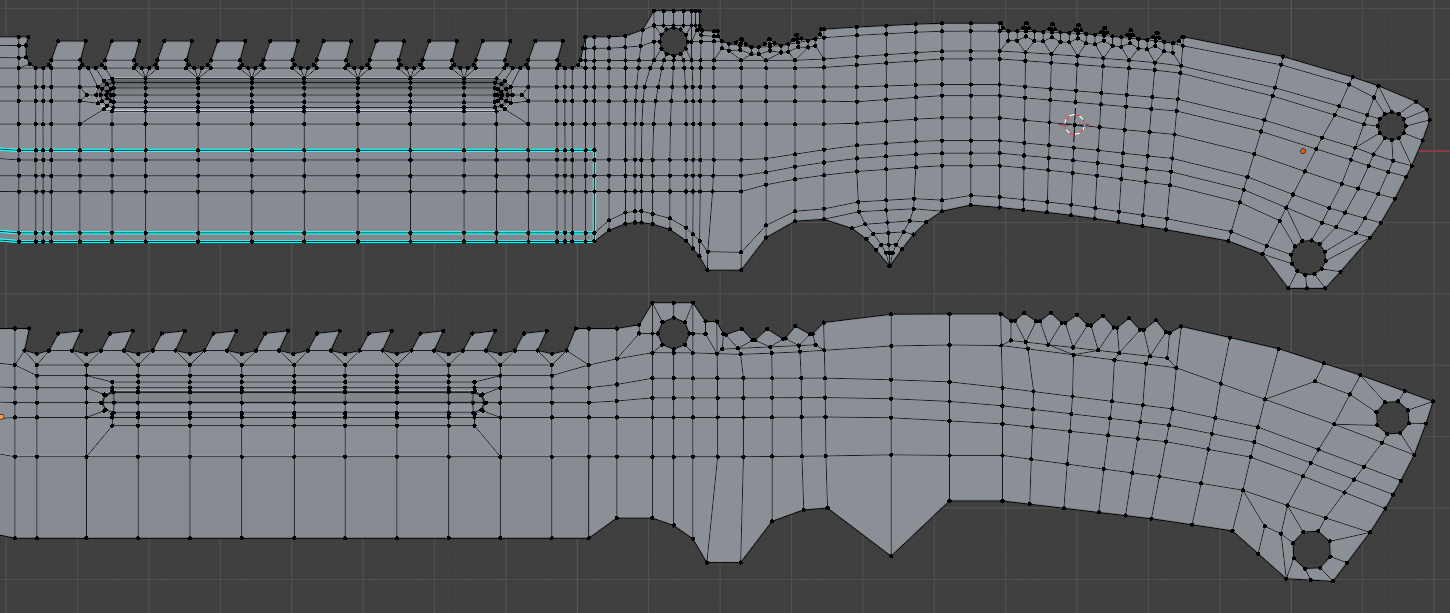
I tried following that video with accordance to my references. So far Managed to make a grip for the knife. Turned out to be pretty decent for my "Bottom of the barrel" skillset.
As for the blade, I basically decided to remodel it from scratch, as seen on picrelated, (Top is old one, bottom is the newer one.) Though I can't honestly say if I did a better job than the last time, especially since I still can't get a solid grasp on vert positions and they end up having a very jittery placement.
>>
File: eep.png (1.5 MB)

1.5 MB PNG
>>1022660
this seems to work, thanks
not sure if this would export neatly into engines like Unreal, Godot etc since it seems to rely on the nodes and vertex paint rather than being purely UVs
>>
>>1022666
>not sure if this would export neatly into engines
Nothing is going to neatly export, you should be focusing on what the final export deliverable is. You can sketch out a material in Blender but anything more complicated than a basic principled or emission shader is going to be tailored to the rendering program.
Some examples of various techniques
https://www.youtube.com/watch?v=QcqJckp_q3M
>>
>>1022666
alright fuck this, chatgpt is being beyond retarded. is there a way to simply add normal maps of the image textures to this, while still having the blending be controlled by the vertex color?
tried using the same setup and adding the normals as their own separate material, but I can only have one applied at a time
>>
so i tried the blender remesh tool in the sculpt menu, man, it produced some seriously funky geometry. like, yeah, they're all quads, but they're so random that you can't even loop select on them? sorry man maya has u beat here. did blender just implement the easiest shittiest remesh algorithm just to say they have this feature? cuz this isn't really usable.
ohhh, i see, i have to buy a "quad remesher" plugin from a 3rd party to have what comes built-in to maya. interesting.
>>
>>
>>1022674
Can't you just put the normals in the same setup and plug that into the normal of the shader? Why would you need another material?
like this:
normal1.png + normal2.png + color attribute (the same one) -> mix -> normal map -> normal
>>
File: setup for normals.jpg (2.4 MB)

2.4 MB JPG
>>1022677
think I got it working with this setup, seems to react to light on a flat subdivided plane as expected although kinda hard to tell with the moss
I'll try your setup too, seems like that'd work just as well
>>1022667
cheers for this btw
>>
File: 2nd setup for normals.png (155.8 KB)

155.8 KB PNG
>>1022679
I think this is the set-up you meant. idk if there's a real difference between the end result
>>
>>
>>
>>
>>
File: 1744394323729396.png (472.7 KB)

472.7 KB PNG
how would i go about making this distort effect? i want something similar to sell the impact of a shot but the stuff i'm finding online is just for regular explosions
>>
>>
>>
>>
>>1022656
>>1022657
>>1022658
Doing and learning the technical shit is what has kept me in art as long as it has. The whole "just do random stuff, then figure out what stuff you need to actually do when you've fucked around for 5 years" thing doesn't jive with me.
I'm more likely to drop blender doing the "just fuck around" method due to sheer boredom and lack of direction than I am from getting overloaded with technical shit. Not gonna pretend I'm some art wizard but I do find being stumped more enjoyable than being aimless.
>>
>>1022701
>Doing and learning the technical shit is what has kept me in art as long as it has
That's a very standard type of self-taught internet artist. They hardly, if ever, make personal work. They do studies all the time and are stuck in tutorial hell, possibly whining why no one likes their boring work if they even bother to post on socials.
>The whole "just do random stuff, then figure out what stuff you need to actually do when you've fucked around for 5 years" thing doesn't jive with me.
That's the mindset you posted with "Doing and learning the technical shit is what has kept me in art as long as it has"
I never said to do that. Solve problems you have and look up how to solve problems when you need them like a normal human with a brain would.
>how do I make a model?
>how do I get my model in game...oh, export to game engine tutorials, wow there are so many options
>how do I texture my model? looks like I have to learn UV unwrapping, and maybe learn what "materials" are
>how do I animate, oh looks like there's rigs and other things to learn, does this work in my game engine?
and so on.
There are too many things to learn for a beginner and no single way to correctly do it all. By the time they need the skill, they'll have forgotten it or never practiced it enough to become good at it. 3D is a fractal of skills to learn, and then gamedev is another entire universe. It is a long haul that will take years no matter what you do.
Here's your tutorial channel, https://www.youtube.com/@grabbitt. You can watch and learn everything you can here and that's barely scratching the surface even with years of industry experience guiding you.
>>
>>
File: whatthefuckbro.gif (883 KB)
883 KB GIF
also how do i stop this stupid shit from happening?
>>
>>
>>
File: whatthefuckbro.mp4 (263.9 KB)

263.9 KB MP4
>>1022714
better video
>>
>>
>>1022717
Enable the F2 and looptools addons
Minute long videos of the setup and basics
https://www.youtube.com/watch?v=OY7FlJ8xTz0
https://www.youtube.com/watch?v=oG6eyIjaZ0M
https://www.youtube.com/watch?v=JAVuPYCcd1k
https://www.youtube.com/watch?v=AJ3NHU6uXvk
There's a newer Face Nearest setting that works a lot better for snapping
https://www.youtube.com/watch?v=RwbG-HAd6Qc
>>
File: Screenshot_20251201_005652.png (3.2 MB)

3.2 MB PNG
I did UVs for this character. Then made the outfit. But when I came back to UVs to plan how to cut my model and add the clothing to the UV map I notice blender folded the left and right halves of the UVs on top of each other.
Any ideas why this happened?
I'll have to remake these UVs because I want the L and R halves to be unique. Goddamn.
>>
>>
>>
>>
>>
File: Blender Compositor Background.png (506.4 KB)
506.4 KB PNG
i just learned how to do a gradient two-colored background in the compositor. here's how i did it. please no bulli, i'm a noob and i thought this was neat.
>>
File: Thumbnail.png (1005.5 KB)
1005.5 KB PNG
>>1022780
added a pink area light so her fur matches the background.
>>
>>
File: file.png (56.7 KB)

56.7 KB PNG
it's my first time using blender and i'm making a die model and i need to add numbers to it
i don't really know how to go about positioning the texts under specific angles around the model
i need to add the text perpendicular to the lines i highlighted, they will be on the edges - not the faces - and there will be 10 total (5 on the opposite side)
are there any tips on how to align text like this? or just a pointer toward a video or something?
>>
>>
>>1022795
sure man, its tedious but dead simple
basically the info that describes "up" for each triangle is the UV map, which is what this guy >>1022728 is editing. its basically the unwrapped net of your 3d shape.
What you need to do is go to the UV editor, select every face, unwrap them, then find the UV option in the top menu to "reset UVs" or something. basically it makes every single UV into one big overlapping triangle. then you do this
>shrink every face (10 faces so 25% should get you plenty of space)
then
>click just one face on the mesh
>move the UV triangle so its out on its own and not overlapping (snap to grid helps)
>repeat for all 10 faces
>find the "export UV map" option and set the opacity and scale
>open the image in your editor of choice
>write numbers on it (ideally in a new layer so you can export just the numbers in a format with alpha
>go back to shader editor window
>new node > image > image texture
>set the image to your numbers, link the colour to the material's albedo and the alpha to the material's alpha
thats all it takes. you can fiddle around with different effects like using the image as a height map if you want the text to look indented, but its pretty much just those few steps
>>
>>1022741
No the mirror modifier was applied.
I think it was when I edited the mesh afterwards with X/Y symmetry on. Some of the verts on the R didn't follow along as they should have so I went to sculpt mode and used the symmetrize operation actoss the -X/X axis. I think that's what did it.
Anyway trying to move those islands was such a cluster fuck I decided just to unwrap again from scratch.
>>
>Ask ai: how to add blender animations from one blender file to another.
ai responce: open both files in the same instance, and copy-paste the keyframes over from one to another
>how do you open two files in the same instance
ai: you cant
wow thanks
>>
>>
>>
File: aaaaaaaaaaaaaaaaaaa.png (1.3 MB)

1.3 MB PNG
I'm trying to recreate PS2-era graphics. with material A I'm blending two image textures together to create an overgrown mossy look, and with material B I'm just applying a second texture for the chipped area
since I'm already using vertex coloring to determine where the moss goes, how do I apply another layer of vcol on top to actually paint it and fake lighting?
looking over noclip.website and looking at PS2 games makes it seem clear that they were capable of texture blending
there's some info on it here but idk, not sure
https://polycount.com/discussion/232570/blending-of-textures-in-ps2
>>
>>
File: vcol alpha.jpg (2.9 MB)

2.9 MB JPG
>>1022839
chill out wee man, I find this shit interesting and I want to go for an authentic look
looking at some GC games it looks like they use alpha to erase parts of a texture to blend. FFX seems to do an overlapping texture alpha trick whereas the GC ones just connect the two textures in a single mesh and fade, not sure how exactly that but it's a start
doesn't solve the fact that I can't texture blend and use vcol lighting at the same time but fuck it
>>
>>
>>
>>
>>
>>
File: 1677198846251BKBWDMBrBUCTD8Cl.png (352.3 KB)

352.3 KB PNG
Where does one start in "downgrading graphics" in Blender to resemble Source Filmmaker's style of rendering things?
I'm moving from Source Filmmaker to Blender.
I love the way the Source Filmmaker renderings come out when done right.
Mostly because I just like the look of it.
I'm fine with Source 2 Filmmaker renderings as well it kind of has it too.
I don't really want to push my hardware to the very limit, and so downgrading Blender's renders to resemble Source 2 filmmaker renders or even Source 1 Filmmaker renders is fine as well.
Here's an example of Source 1 Filmmaker's rendering style: https://www.youtube.com/watch?v=PRzwL6BN6ww
Here's an example of Source 2 Filmmaker's rendering style: https://www.youtube.com/watch?v=loCuaDAaYqs
>>
>>1022879
You learn lighting, shading, and compositing. You can try using EEVEE but there's no such thing as "downgrading graphics" which makes it sound like you never learned to render anything in SFM in the first place.
>>
File: jb-orb.png (2.4 MB)
2.4 MB PNG
I made this today, learning blender is fun :3
>>

>>
>>
File: Blender.png (565.6 KB)

565.6 KB PNG
>radial tiling node
>when you STILL cant do the same shit to model wheels like a normal person without doing an entire fucking rig
fuck this troglodyte backwardsthinking shit
>>
>>
>>
>>1022882
>which makes it sound like you never learned to render anything in SFM in the first place.
You got me. I only dicked around in SFM. At most I would just pose stuff and then take funny screenshots of making funny GMOD faces back in the day.
>you can try using EEVEE
Okay I'll look into EEVEE thanks!
>no such thing as "downgrading graphics"
I should have said something along the lines of a more stylistic choice. I'm not looking for high fidelity.
>>
>>
File: 1739081034112411.jpg (1.1 MB)

1.1 MB JPG
>>1021529
Hello. I got some Metroid models and wanted to print them but they are T-posing. I suck really fucking hard at manipulating Blender to the point I keep enlogating bones over properly adjusting their joins and even then I keep taking too long to get anything done.
Is it possible for me to use something like a specific pose to make the model follow? Even if there is a fucking canon in the place of the right forearm? I'm thinking of perhaps something like a pose pack and making Samus follow those poses and then print them as those. Perhaps do the same for others.
Any way to do that?
>>
>>
>>
File: image.png (113.1 KB)
113.1 KB PNG
Can someone spoonfeed a dumbass such as myself a tutorial or course for a mid poly character? Yes, I suck at blender but I am trying to learn. I have made the donut, followed plenty of low poly tutorials, but I cannot make my vidya character for the life of me.
>>
>>
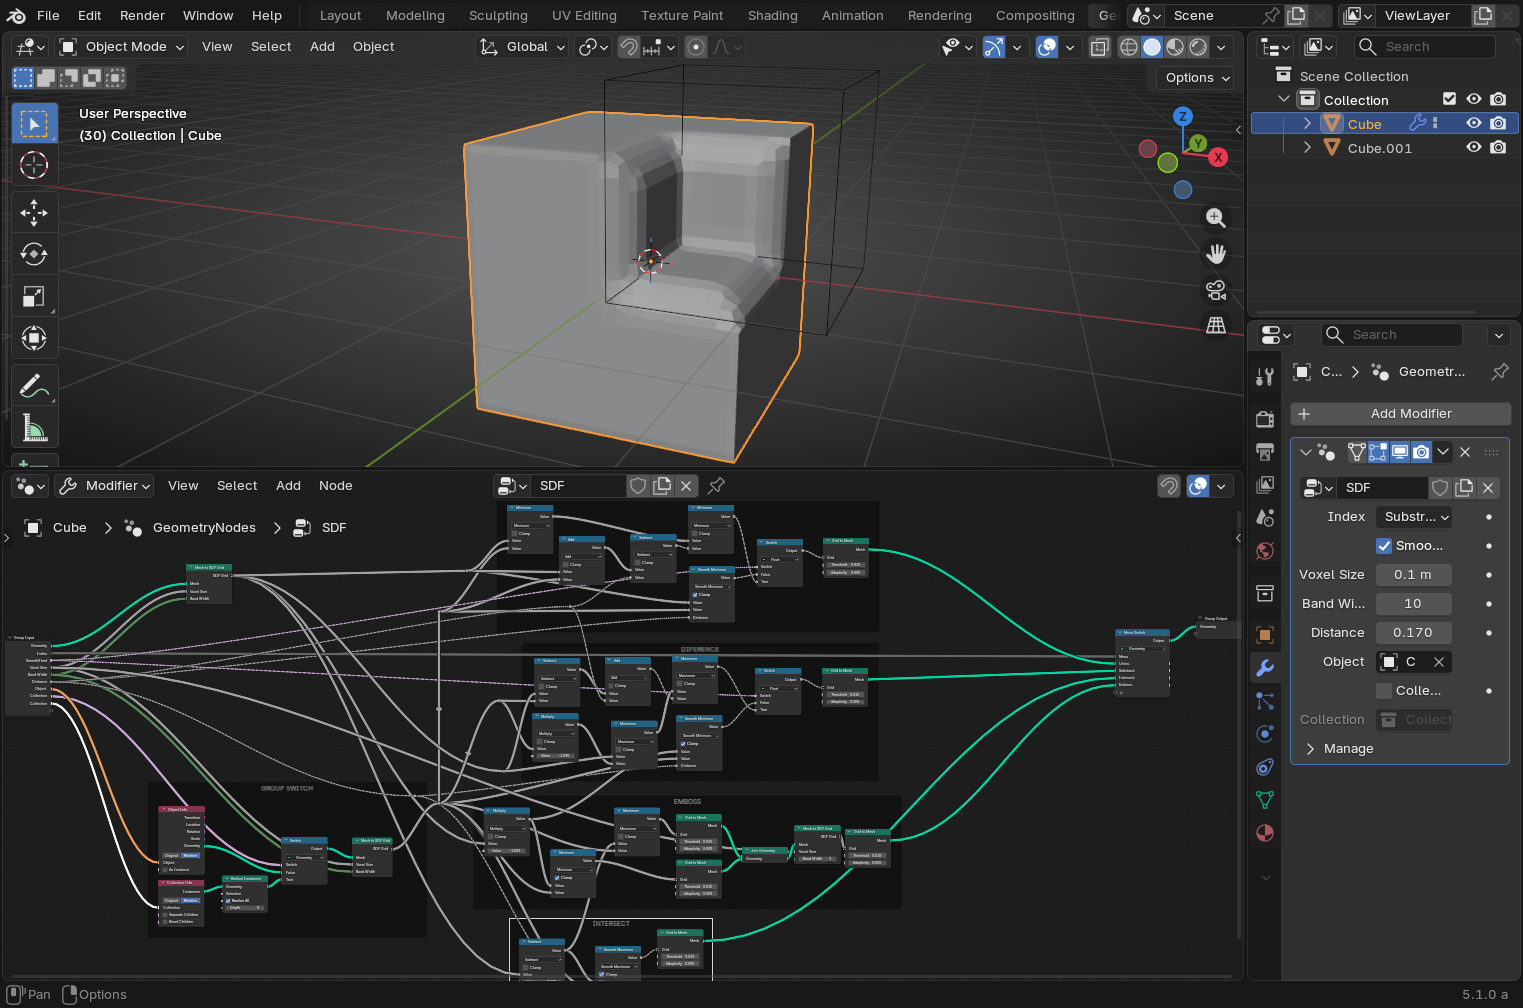
File: SDF.png (566.7 KB)
566.7 KB PNG
So I've been playing a bit with the sdf nodes again and i've made my own version based on the one from the demo files page.
All is slow as fuck so I have to work at lower resolutions >(voxel 0.1, Band width 10) and to increase it at voxel 0.03 Band width 30 at the end.
Some things are missed, it is just a basic version, just in case somebody want to play with it.
https://files.catbox.moe/0y60du.blend
>>
>>
>>
File: frick blember.webm (2.9 MB)

2.9 MB WEBM
>object parented to armature
>weight paints applied to bone
what arcane combination of keyboard shortcuts did I forget in order to to properly attach the object to the armature
>>
>>
File: 1761565188279964.jpg (879.7 KB)

879.7 KB JPG
Need help again. Mixamo didn't work. I guess the model I'm using, pic semi-related as it's a Dread Suit Samus, was incompatible. The option to apply the animation to the rig was greyed out and forcing it just glitched it causing an error.
I just want to print Samus in something like holding a canon or aiming. in fact I planned to use a Mixamo animation of someone aiming onehanded with a gun for that.
Is there any way for me to apply like a pre-made pose to Samus? In a way even if it's someone holding a pistol it'd force her in the right way to seem like she is aiming with a cannon?
>>
>>
>>
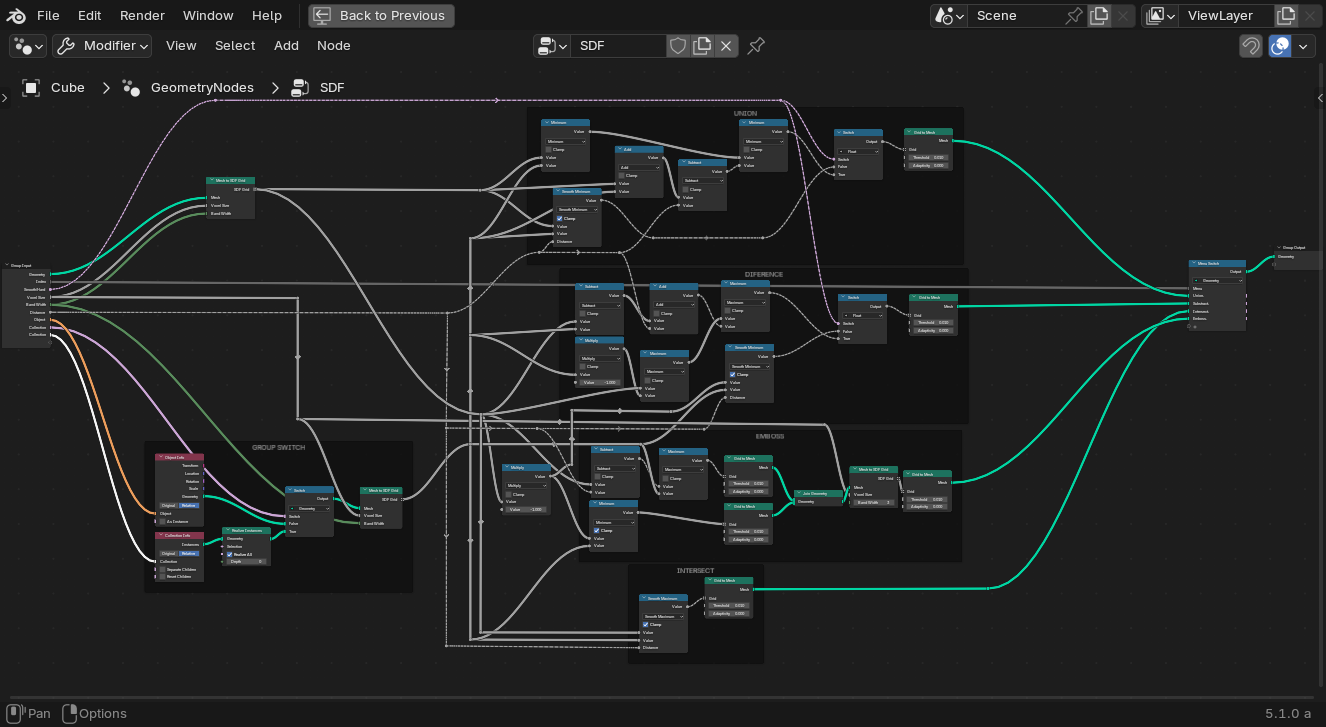
File: SDF.png (209.2 KB)
209.2 KB PNG
>>1023006
I've fixed the emboss and cleaned the nodes a bit
https://files.catbox.moe/twhnnw.blend
>>1023015
This is not that hard to read, you should take a look at the demo files.
>>
>>
>>
>>
>>
>>
>>
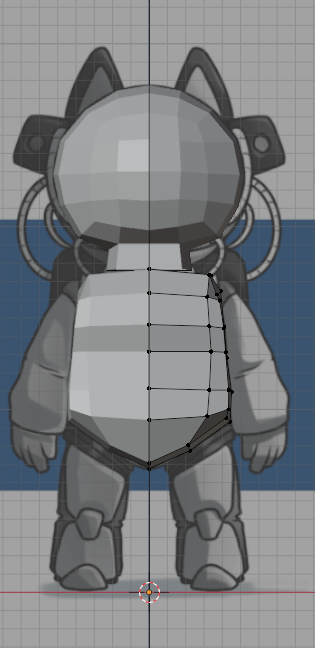
File: Screen Shot 2025-12-07 at 10.34.40 PM.png (180.7 KB)
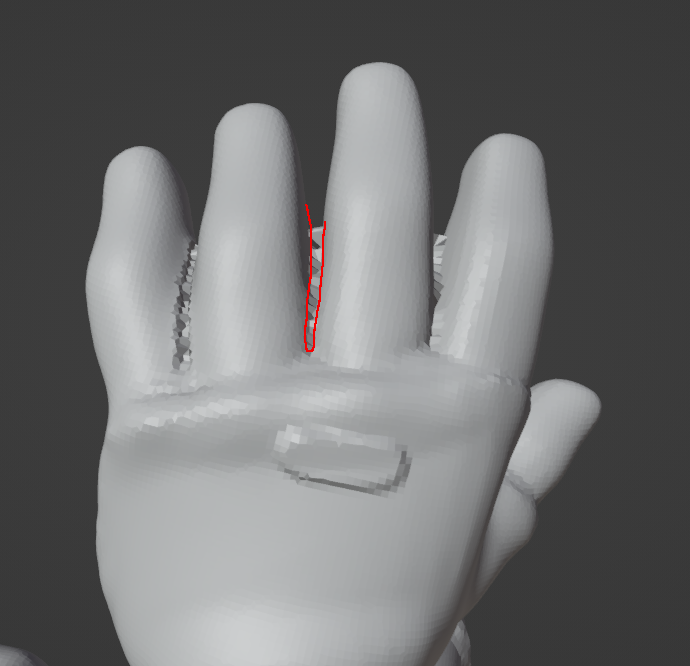
180.7 KB PNG
When I remeshed my character for sculpting the spaces in between the fingers got all combined. Is there a tool to carve out the polygons in between the fingers? I was trying the crease and inverse clay strips tool but it wasn't really doing anything. I thought I'd be able to just leave it, but I'm retopologizing the hands now and it's becoming an issue
>>
I need to finally learn Blender(properly)
I am willing to spend money on a course as long as it's reasonable.
Is there somewhere that updates their resources to at least a decently recent version of Blender so I don't have spend most of my time googling around where to find stuff that changed since the course was made? I took a look at Udemy and at least for some courses it was still an issue, I hate that shit.
>>
>>

>>
>>
File: Pinches.png (275.5 KB)

275.5 KB PNG
>>1023116
>>
>>
File: Result.png (246.4 KB)
246.4 KB PNG
>>1023118
Nevermind, I figured it out.
This shit look ugly as sin, but it somehow gets the job done without any pinches, which is fine by me.
>>
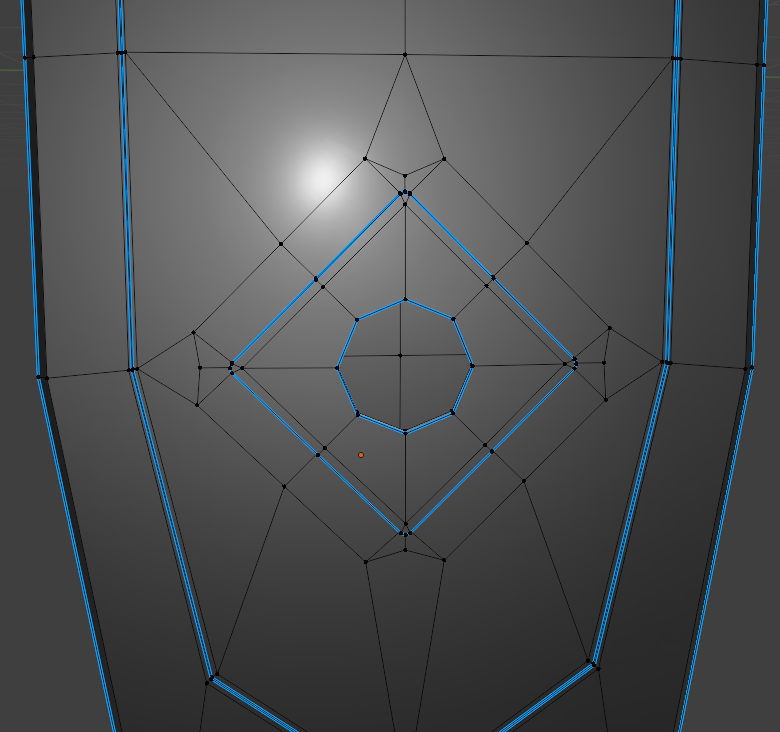
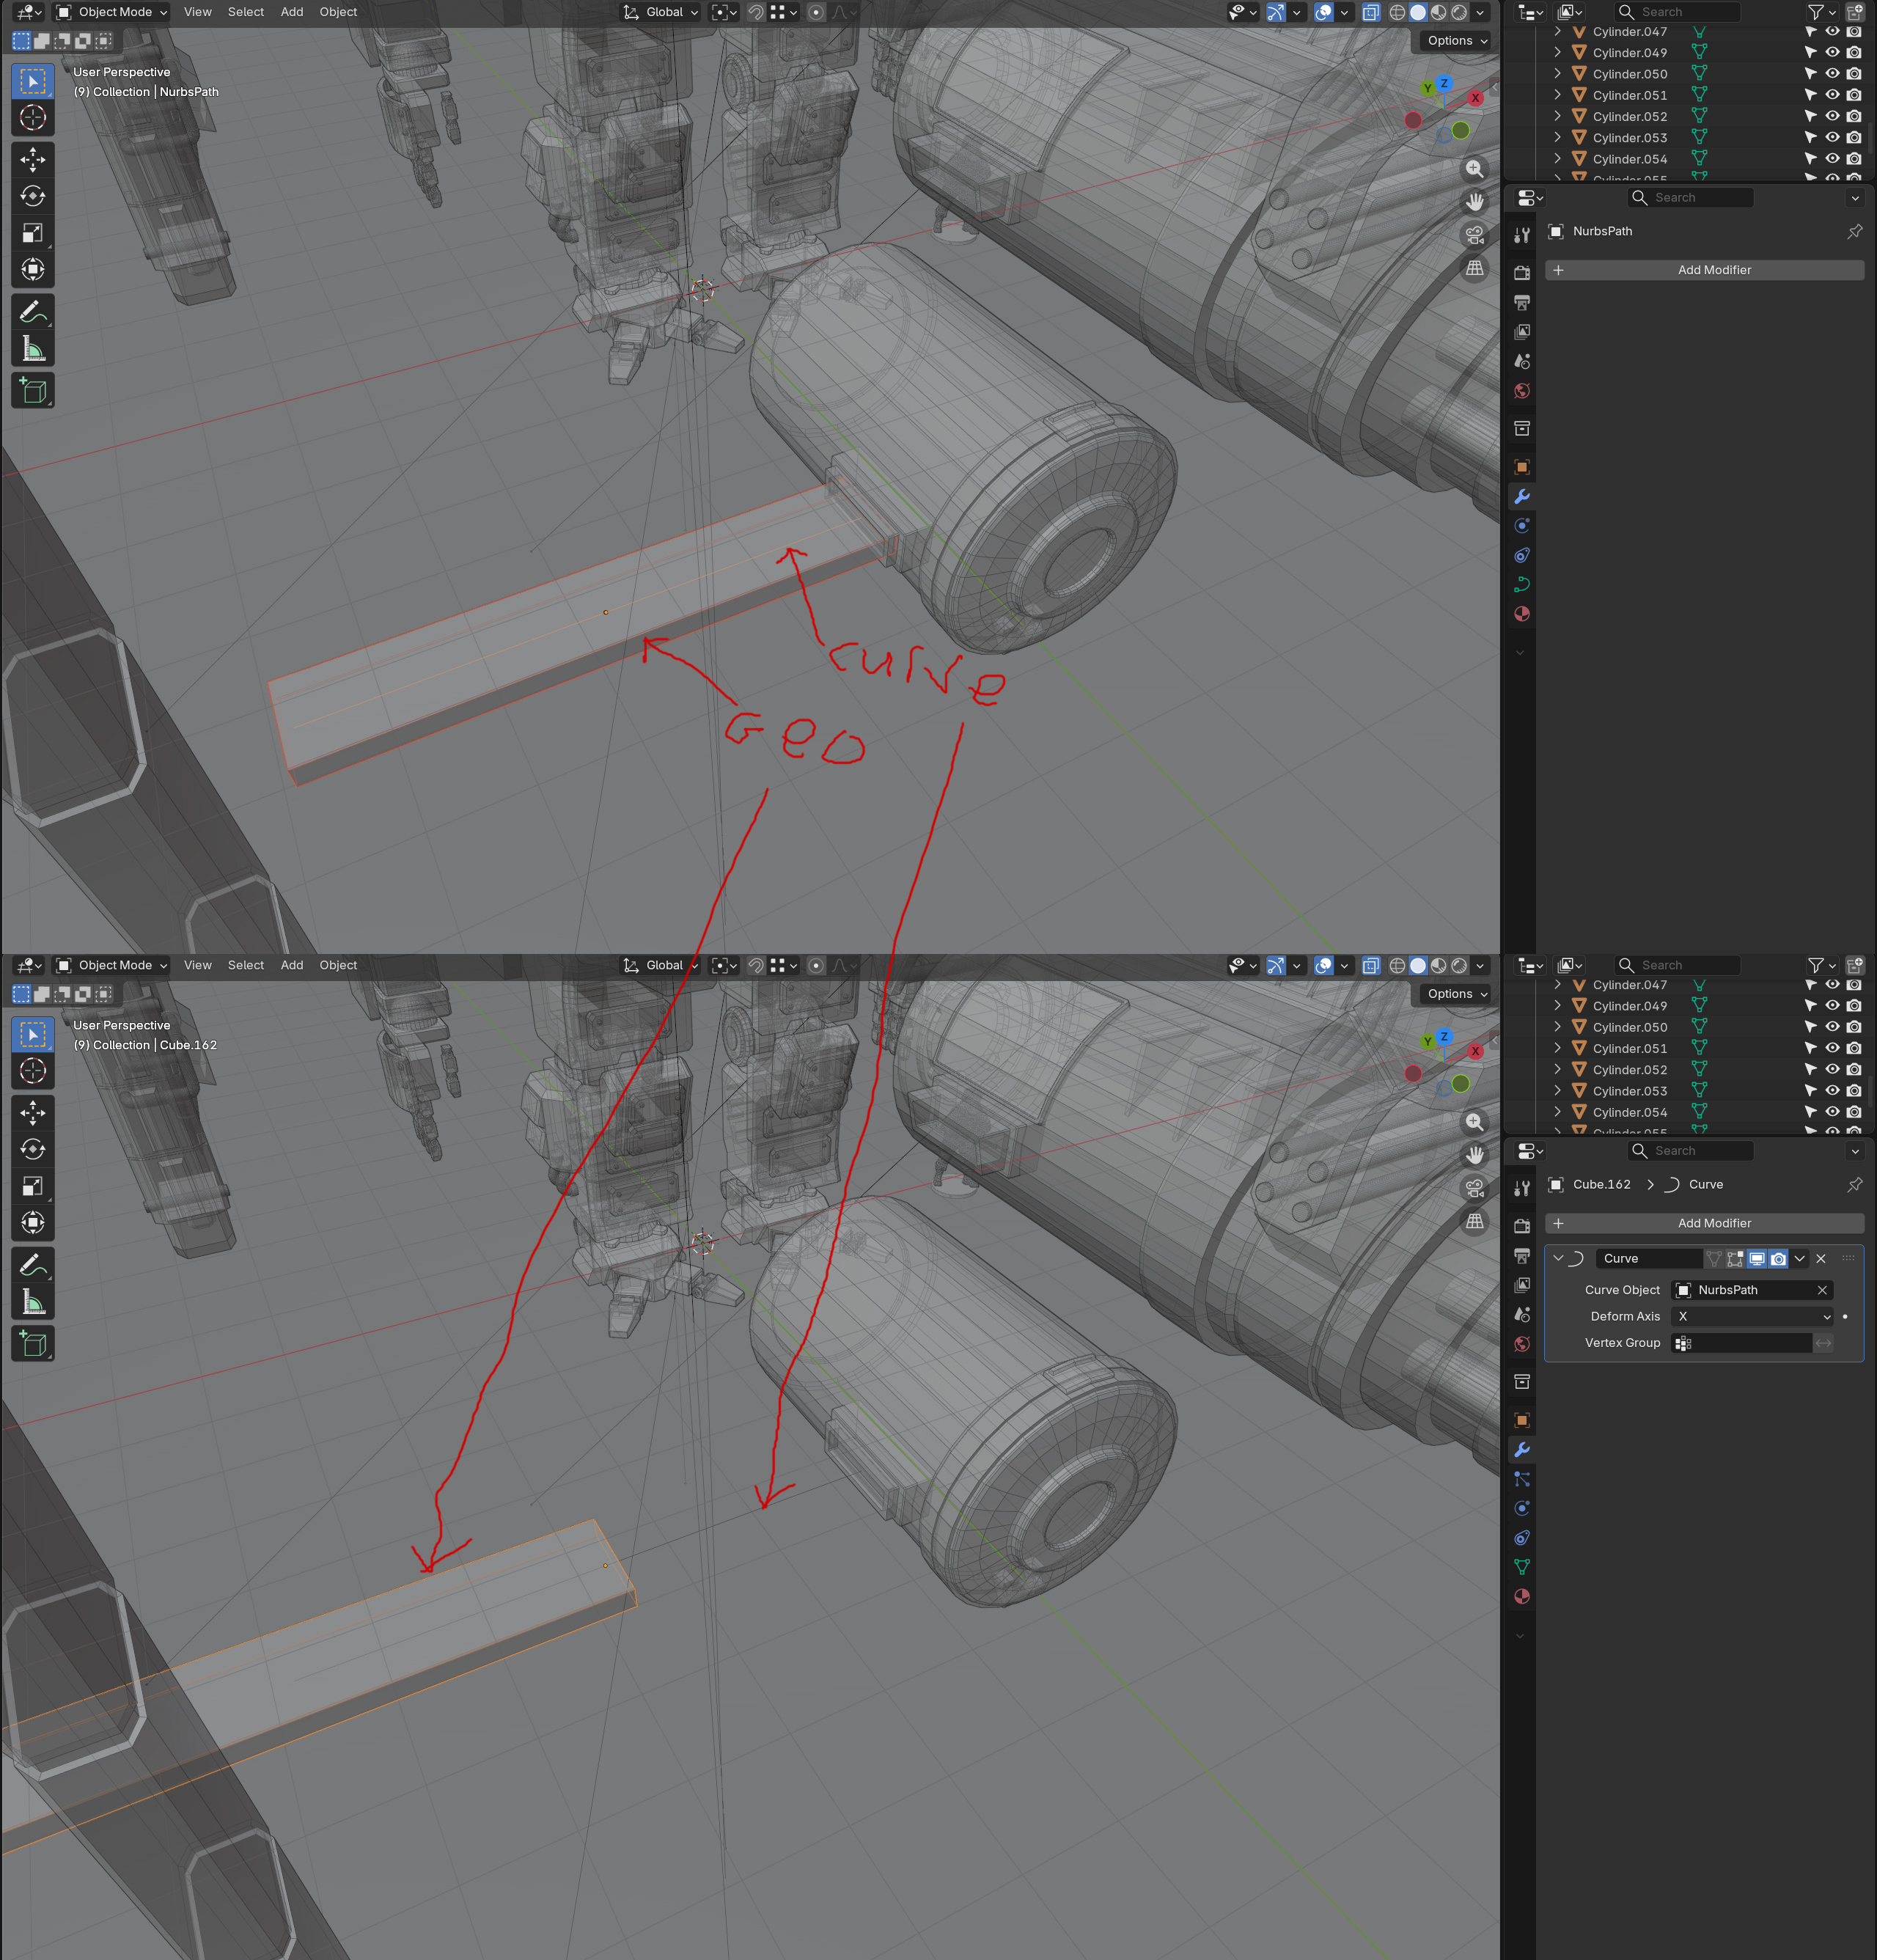
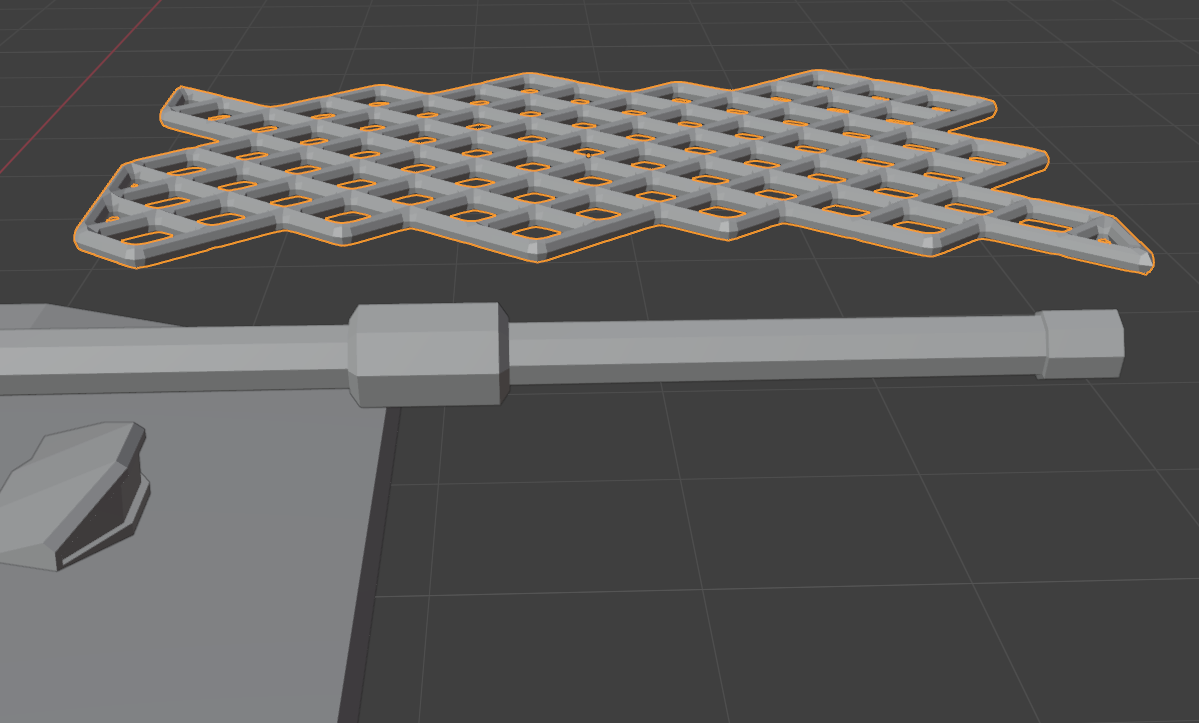
can someone help me understand how the curve modifer works in this software?
it keeps always adding a seemingly random offset between my geometry and the curve. i've tried clearing the transforms, making sure both object and curves origins are in the same spot, the relation between the geometries orientation around the curve and the curve itself just seems completely nonsensical to me
and of course every tutorial just starts with both object and curve at world zero origin with nothing else in the scene and works perfectly, which is completely impractical when im trying to model wires or a belt or something on a character
>>
>>1023101
Never paid for a course but CG Boost or CG Cookie are probably your best bets. There are actually a lot of pros who make decent videos now for free on youtube to fill in gaps, but there aren't any overall courses to recommend.
You should be fine with anything past 2.8 really. 5.0 just came out but anything with 3 or 4 should be fine, there's only better ways to do things
If you were stupid enough to look at Udemy though, you're probably ngmi
>>
>>
>>
File: 1746520154077217.png (198.4 KB)
198.4 KB PNG
im trying to make a low poly tank and i want to add some camo netting on the barrel. i made a net like picrel and made it cloth in the physics tab. the barrel has collision enabled but the cloth wont fall. i looked up tutorials on the internet and their cloth objects were falling instantly. any ideas?
>>
>>
>>1023123
be sure to check which deform axis the curve modifier is using. Then everything deforms based on their position on that axis, using the curve's pivot as a reference, and following the curve itself. for the purposes of that deformer the curve is considered as extending as an infinite straight line at its boundaries, along the curve's direction at those points.
so basically decide on your deform axis, center the mesh on the curve, then translate it along that axis to see how it snakes along the curve. Prolly a good idea to make the mesh a child of the curve.
>>
File: 1750659781930329.png (128.9 KB)

128.9 KB PNG
>>1023130
turns out the bevel modifier was preventing it from falling. but now this happens lol
>>
>>1023120
The vertex bevels in the corner isn't a great way of doing that. You should be using insets and proper control loops with subd instead of trying to use sharp.
Topo for controlling corners
https://youtu.be/8MLEzEn8hN8?t=230
>>
File: curve modifier 2.jpg (725.4 KB)

725.4 KB JPG
>>1023131
okay, i still dont fully understand it but that helped. an array modifer also seemed to help instead of trying to just subdiv and stretch geo along the path, instead adding array steps to progress along the curve. it behaved much better doing that.
thanks
>>
>>
File: 1749865580268956.png (3.7 MB)
3.7 MB PNG
>>1023055
>>1023068
>>1023081
I didn't find any of that but I sought a basic tutorial to move with the mouse wheel and tab as well as asking Grok help here and there to move the joints.
Thanks bros.
Now this is what I got. I think it's pretty good isn't it? This model was just standing before
>>
>>
>>
>>1023151
It sounds like he's fitting a proxy mesh to his VR chat avatar for a standardized swappable clothing system.
At least that's what I'm picking up from the Japanese text, why he's doing it that way I have no idea, must be related to the system.
>>
>>
>>
>>
>>
File: 1737152193763465.png (438.5 KB)

438.5 KB PNG
>>1023162
Alright this will take a while but thanks for the link I'll probably learn what I seek
>>1023163
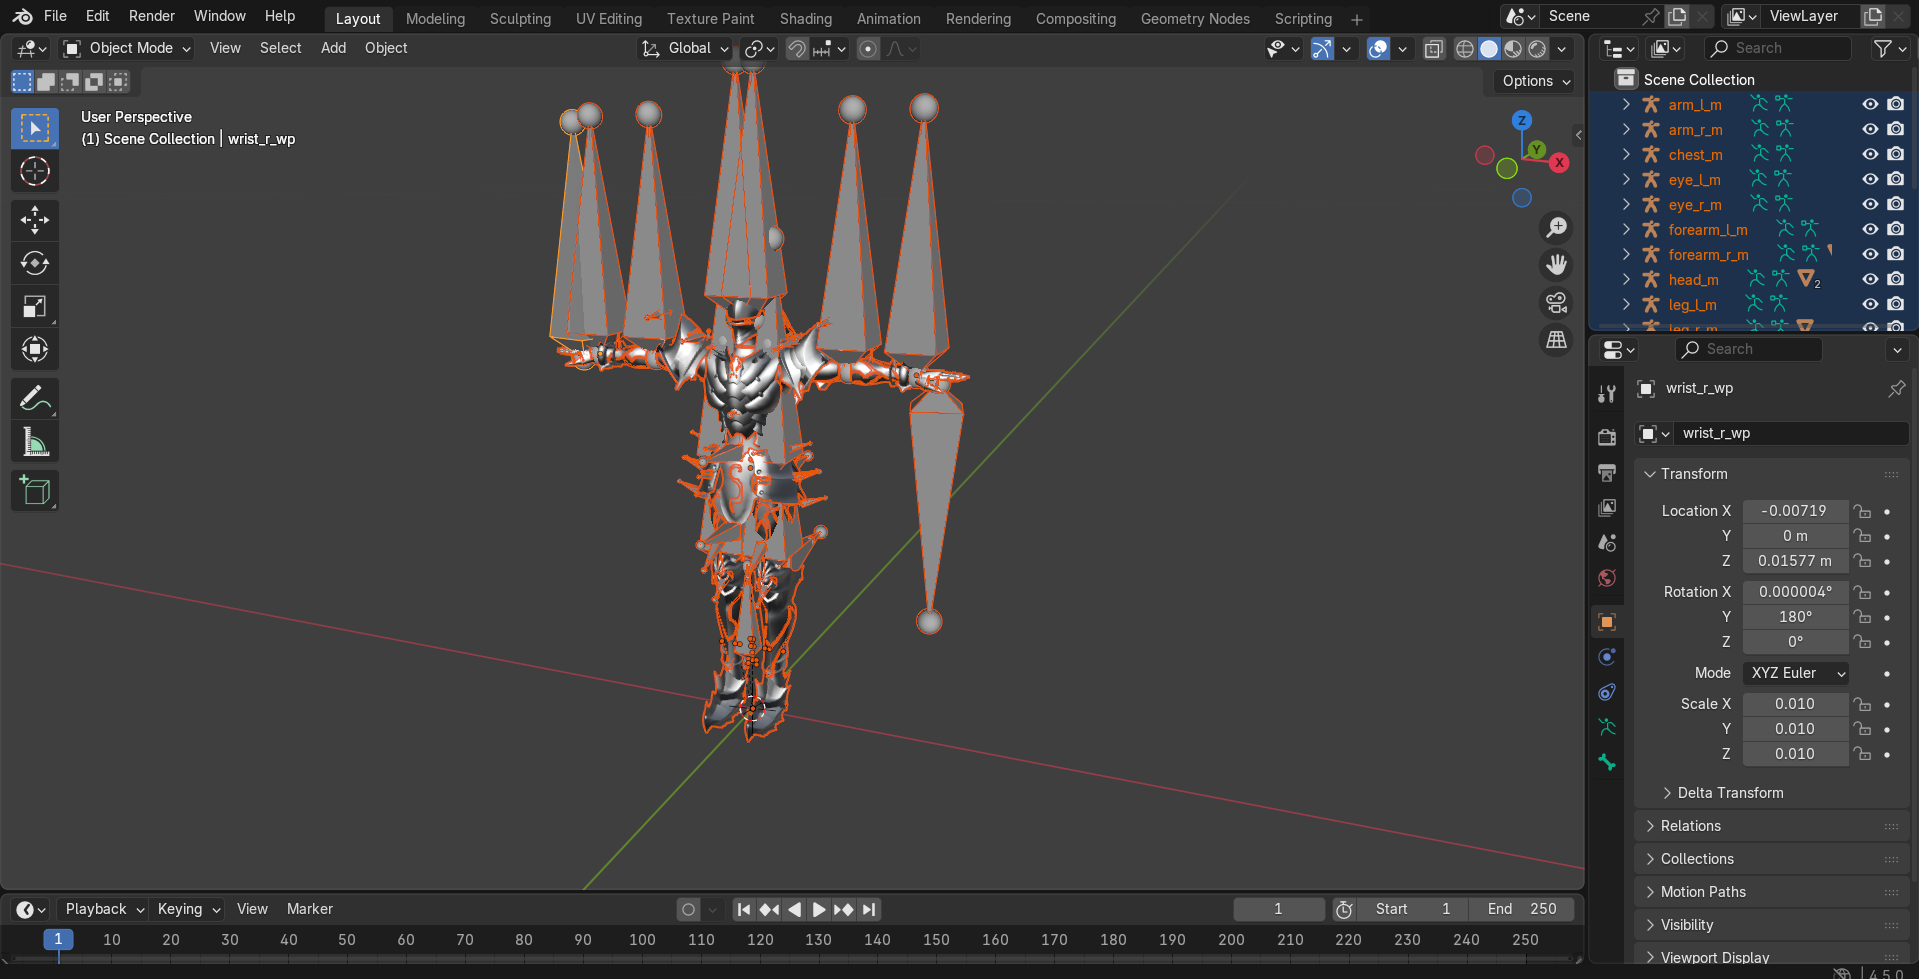
Specifically this. When I move the position of Samus' arms they are properly restricted to their maximum length but when I'm moving the legs they get stretched if I exceed a limit. I want to fix this limit so I can try more movements and newer poses later.
>>
>>
File: 09-12_16-57.png (168.7 KB)

168.7 KB PNG
>>1023164
That looks like a custom rigify rig, what you want to do is select the IK controllers for your legs and set IK Stretch to 0
Also disable Auto IK, why do you have that on?
>>
>>
>>
File: 09-12_19-28.png (7.2 KB)

7.2 KB PNG
>>1023172
Right now you have viewport solid active, it disables the textures and shading for performance, you can switch to either preview or render view
Were you planning to 3D print that? You're going to have a nasty surprise because a lot of details are textured with a normal map and not part of the mesh
>>
>>1023174
Thank you bro. It's still a bit weird but now I see the rest
>Were you planning to 3D print that?
Yeah, learning how to move the poses solely for this. Though I also plan later to do the same with models from other games like Warframes
>You're going to have a nasty surprise because a lot of details are textured with a normal map and not part of the mesh
oh boy...
>>
File: 21d339fa-a6ca-4fc1-b57b-618914a85c74.jpg (131.6 KB)

131.6 KB JPG
>>1023174
Now I understand what you meant. Is there any fix for this? It isn’t like I was looking for something ultra detailed but not super polygonal either.
If it’s too much I suppose I can find models of good old Varia suit that has a smoother design with her metal parts compared to Dread Suit’s biomechanical.
>>
File: 09-12_20-17.png (150.1 KB)
150.1 KB PNG
>>1023177
There's no easy fix
You can try using a subdivision modifier (left monkey), it will divide the faces and smooth them, but it might cause issues if you mesh is not prepared for that and it might smooth out details and shapes
You can also try remeshing (right monkey) and smoothing the facets manually with the sculpting mode but the learning curve is higher (but if you learn to sculpt you can sculpt details back in)
>>
File: 1756609502919872.png (890.7 KB)

890.7 KB PNG
>>1023180
Decimating didn't seem to make a chance in the slightest. Subdivision didn't affect the polygons, though it erased her shoulder pauldrons.
I don't think there is much that can be done about it this way.
Seems like this is it.
>>
File: 1752987442050164.jpg (154.5 KB)

154.5 KB JPG
>>1023180
Also thanks a lot for the help. The way I see it just learning to pose her was a big advancement. I'm gonna hope it's just that her model is too complex or too simple to smooth out like that and that maybe other video game sprites will be smoother.
>>
i've been doing the bad.
i've been modeling some hard surface fast and loose with bevels and n-gons. designing models for 3d print, i thought it wouldnt affect it that much, its all hard surface, it'll tesselate just fine i dont have to worry about deformations or anything.
boy was i wrong. crazy artifacting and pinching left and right from the export tesselation. the shapes are all simple but the model is like 1000 pieces . does blender have anything like zbrushes zremesher or something that can quickly shit out some reasonably clean quadded topology? i really dont want to have to go back through and manually fix every part on my model. it doesnt have to be perfectly professional cleanly topo'd borders or anything, just serviceable enough that i can print it without sharp triangle faceting everywhere
>>
>>
>>

>>
>>
>>
>>1023188
>dont talk about 3d on the 3d board
come on. this board has posts that are months old, it's not exactly like we get a ton of traffic here anyways that we need to split off separate threads left and right
i'll take printing tech support over another doomer jobs post any day, at least the printers actually doing 3d
>>
>>
File: file.jpg (141.7 KB)

141.7 KB JPG
blender noobie here. i'm trying to make a bundle of muscle fibers for joints but i can't think of a way to get what i want. i tried arraying a curve to a cylinder and parenting it but i can't apply the array to get individual control of curves because it's not a mesh. i'm kinda stuck.
>>
File: MagnusCool.png (1.2 MB)
1.2 MB PNG
>>1023191
Idk how fast the solver with collections is but that could be too much for my computer.
>I like the subdivided icosphere.
ty, I use it a lot.
>>
>>1023197
i am a big fat blender retard so take what i say with a grain of salt since i barely know shit myself and have only gotten back into modeling very recently
you could try using bezier curves and adjusting the depth of them in the object data properties. you can convert them to mesh once you're done and you can control it pretty well
>>
File: 39fd4811-8262-4090-ae1d-dd39c6fa91e2.jpg (47.7 KB)

47.7 KB JPG
I need help. I assume the reason my Samus is going polygonal no matter what is because the yellow portion becomes the outer one or overlaps.
I tried to export as a .obj just to see what happened and well this happened. Not sure if the white one is what I truly seek or if the yellow body is some important internal structure. Does anyone know how to solve this? At very least to make their left foots un-fused for me to see how the white smooth body’s impression turns out? Or at least how to properly allign them so I get a smooth figure printable?
>>
File: 1752250743512261.png (607.4 KB)
607.4 KB PNG
Alright alright alright alright I am getting somewhere.
When I selected Armature, it seems it fixes the issue. Not on the STL, the STL keeps being a yellow polygon but in the obj it becomes a single white smooth result.
Problem is: I don't know how to apply this in bulk to all her parts. Holding SHIFT to select them all just causes the first one to be applied. So I've been doing this one by one to each of her portions except the cannon.
And the second problem: her arm cannon has a TON of internals. To the point I think this arm cannon alone is more complex than the rest of her entire body.
Any suggestions bros? I feel I'm really close here to getting it right or at least passable to print her.
>>
File: 1739626419888728.png (139.7 KB)

139.7 KB PNG
The result so far
>>
>>
>>
>>
>>
>>
>>
>>1023227
>Should I get an older Blender version?
You'll miss out on features and performance improvements. Try to keep your projects more modest instead.
If you really want to improve your Blender performance then switch to a linux distribution. Modern Windows is far too bloated.
>>
>>1023227
Blender dropped the support for old graphic cards in the ... 4.5? just check if the program recognizes yours, if it doesn't you could download an older version to render with cycles, they are dropping the support for older cpus too so you'll have to update your pc eventually if you want to run the latest version.
>>
>>
File: 1741922749146316.png (583.1 KB)

583.1 KB PNG
>>1023212
Like this
>>
>>
>>
File: 1756418976754100.png (227.8 KB)

227.8 KB PNG
Any ideas how I can move this without being as rubbery? Even if I need to clip it?
>>
File: blender wireframe.jpg (241.3 KB)

241.3 KB JPG
>>1023238
gonna be honest, the transparent wireframe only view isnt going to tell us shit
do this instead
>>
File: 1738349615875117.png (669.7 KB)

669.7 KB PNG
>>1023251
>gonna be honest, the transparent wireframe only view isnt going to tell us shit
DDoes this help?
>do this instead
I can't locate those options
>>
>>
File: 1756809794472600.png (800.2 KB)

800.2 KB PNG
>>1023253
Thanks.
But what now?
>>
>>1023254
well this was just to help identify if the detail you're missing and the polygonal faceting you're seeing on the samus model is because the detail is actually part of the texture maps and not the geometry itself. it was hard to tell because every screenshot you posted of the samus model it either had all its texture maps enabled and shaded or had some blown out bright white or metallic material that made it hard to see.
ideally i'd want to see something like >>1023144
but with the wireframe enabled, and if you're seeing details, panel cuts, ridge lines, etc where there is no additional polygonal detail, then its in the textures, and that wont print
if its anything like >>1023254
model, its 100% in the textures and you may be up shits creek as far as getting that detail you want in the print
>>
>>
>>
>>
>>
>>
File: zbrush displacement map.jpg (201.3 KB)

201.3 KB JPG
>>1023257
>>1023258
i did once see a way to bake normals or displacements into the geo in zbrush using some workarounds, but it was kinda janky and i dont really remember exactly how to do it, it was in college like 10 years ago before i learned any best practices, so definitely dont quote me on that lol
you would probably want to add a few subdiv levels before doing it though
>>
>>
>>
>>
>>
>>
>>
>>
>>
>>
File: SDF.png (343 KB)

343 KB PNG
So yes, I'm still playing with the volume nodes, I simplified the emboss and I've added the strip mode.
https://files.catbox.moe/pcwuef.blend
>>

>>
>>
>>
>>
>>
File: 1750924713188309.png (437.5 KB)
437.5 KB PNG
>>1023539
Oof took until now for this captcha to let me post anything. It was Berserker Lancelot's model from FGO Arcade. How it was extracted I do not know, I was trying to use programs to extract models from games with no success and while searching around found someone had extracted everything. I actually desire to use a model of Siegfried but all of them are with titles rather than their names so I'll have to go one by one
>>1023542
Thanks, will ask there
>>
>>
>>
>>

>>
File: 1756388461962225.png (473.6 KB)

473.6 KB PNG
So I managed to learn more. That these bones can be connected via snapping vertex but then comes the issue that I can't select them all. Whatever process that extracted these models caused them to have colossal and tiny bones in weird places. I even learned how to scale them properly, connect some of them properly. But not all. Some are just impossible for me. Specially his thigh which has a bunch of bones in it. They overlap while others I can't even click.
Is there some program that can just put them all into place normally? ONce that is out of the way getting him to pose would be... easy in comparison to this daunting task.
>>
File: 1756676402664157.png (589.1 KB)

589.1 KB PNG
I used the rigfy option and adjusted to fit him. But now I can't unite them. I selected everything and in the end the rig. But when I click Ctrl+P to set the weights...
>>
File: 1747536589725666.png (903.9 KB)

903.9 KB PNG
>>1023631
This happens. It separates the rig from Siegfried, and gigantifies him. And puts him like that on the ground.
>>
>>
File: 1765033391198545.png (684.1 KB)

684.1 KB PNG
I gave up and just made a new rig anew with the model as an exported and imported .obj to simplify it and overlay it. I then did the stuff of Armature Deform with Automatic Weights but it didn't follow. Then I did the IK to FK thing setting it to 1.000 but even then it just moves the lines, it doesn't move the arm or anything like that as if the rig didn't fuse with the model
I just don't understand what is going so wrong with it
>>
>>1023187
Nta. I've been trying to make some miniatures and using this technique basically. But that seems so computationally demanding and just immediately makes all my perfect detailed topology go into millions of polygons. I've tried working with more hard surface elements that are very precisely perfect. With a intention to just boolean them together. But it took so much time, holy shit, I was only able to make a part of a leg before I gave up. It really made me realize why anything true sci-fi aesthetic in miniatures is 10x the price of standard Warhammer or fantasy stuff.
>>
>>1023642
You can decimate the sculpt after if needed, on average the remesh output to me is 20M and it is too much for my computer too, if you want a better topology you can run quad remesher and if you want to make hard surface models the best option is Plasticity.
>>
>>
>>
>>
Shot in the dark since this is a more technical issue rather than just "how to use blender" but just in case anyone has encountered this:
Every so often, fairly randomly (sometimes after minutes of work, sometimes hours) of using blender, my entire PC will completely freeze, my mouse cursor is still controllable, but at best the OS is navigable at like 1 frame per minute. Task manager (which takes forever to open) shows NOTHING causing high usage, I am forced to hard power down (hold power button) my PC to resolve this.
Its happened many times in the past 2 weeks and ONLY with blender, hence asking here.
For what its worth:
>Windows 11
>Blender 5.0
>RTX 4070, 32GB RAM, 7800X3D
I have searched everywhere but nobody seems to be mentioning this problem and I have no idea how to diagnose it. So I'm checking if anyone else who has used blender has had this happen to them and knows a solution. I'm desperate here since its making blender essentially unusable.
>>
>>1023660
W11 just sucks desu. You can try downgrading back to 4.5 and seeing if it still freezes or not. If you have any gamer boosts like clock or voltage, then set those to default. Look up your mobo settings and suggested baselines for the CPU/GPU.
Too many possibly troubleshooting things, check the event log when it happens after reboot
>>
File: ev.png (835.2 KB)
835.2 KB PNG
Any anon knows where i can find a torrent of this course? I don't have a cgpeers account.
cgpersia only has those damned sites like rapidgator or nitroflare that only let you download at 20kbps and limit the file size.
>>
>>
So it is survey time: https://survey.blender.org/feedback/2025/
Positive
Users in this category expressed gratitude, excitement, and satisfaction with the current state of the software and the development team.
General Appreciation:Overwhelming gratitude for the software being free and open-source. Many comments simply stated, "You guys rock," "Best 3D software," and "Thank you for changing my life."
Development Speed:Several users are impressed by how quickly features are added (e.g., "taken aback by how quick development has been as of the past 3 or 4 years").
Geometry Nodes:Significant praise for the power and potential of Geometry Nodes as a foundation for future tools.
Community & Transparency:Users value the open communication, the "Blender Today" streams, and the feeling of being part of a family.
Specific Features:
Cycles: Praise for the addition of ACES and general rendering quality.
Modeling: Many users feel the modeling tools are strong and improving.
Portability: Excitement for the move toward Apple Silicon support and potential iPad versions.
Vulkan: Transition to Vulkan was noted as a positive step by technical users.
Comparisons:Users frequently mentioned Blender allows them to escape paid subscriptions and that it competes well with industry standards.
>>
Neutral
This category includes feature requests, mixed feelings, suggestions for improvement, and comments from users who are still learning.
Feature Requests (Specific):
CAD/Precision: High demand for NURBS, CAD-like precision tools, measurement tools, and better .step/.iges import support.
NPR (Non-Photorealistic Rendering): Strong desire for better toon shading, anime-style tools, and better NPR support in EEVEE Next.
Simulation: Requests for better fluid, smoke, and cloth simulations (often compared negatively to popular commercial software).
VR/AR: Requests for better VR inspection tools and controllers.
Workflow Integration:Users want better interoperability with Unreal Engine, Unity, and After Effects.
Geometry Nodes (The "Too Hard" Factor):While praised, many "Neutral" comments noted that Geometry Nodes are too mathematical/complex for artists and requested pre-made tools/modifiers so they don't have to "program" everything.
Learning Curve:Beginners mentioned the UI is intimidating and requested better onboarding or official structured tutorials.
Video Sequencer (VSE):Many users want the VSE to be more robust to replace commercial alternatives, asking for better performance and audio tools.
>>
Negative
Users in this category expressed frustration with specific modules, bugs, development priorities, or regressions.
Texture Painting & Baking (Major Pain Point):This was the most frequent specific complaint. Users feel this module is abandoned, outdated, and lacks a layer system (layers are constantly requested to compete with the industry standard solution).
Sculpting:Complaints that sculpting performance (high poly counts) is lagging behind the most popular 3D sculpting tool and that "Sculpt Layers" and Multiresolution modifier bugs have been ignored for too long.
UI/UX & Keymaps:
Frustration with constant shortcut changes between versions.
Complaints about the UI becoming cluttered or "too many clicks" for simple tasks.
Specific dislike of the "Extension" platform and how addons are managed.
Development Pace & Stability:
"Too Fast": Some users feel updates come too quickly, breaking add-ons and making it hard to finish projects (LTS stability issues were mentioned).
"Too Slow": Conversely, others feel core issues (legacy bugs) are ignored in favor of shiny new features.
EEVEE Next:Specific complaints about regressions in performance, shadow quality, and the loss of stylized/NPR capabilities compared to the legacy EEVEE engine.
Artificial Intelligence (AI):A strong, distinct subset of users is vehemently opposed to Generative AI (LLMs/Image Gen) being integrated, viewing it as unethical or environmental theft. (Conversely, a smaller group wants AI tools, but the anti-AI sentiment is louder/more aggressive).
Rigging & Animation:Users coming from other DCCs feel the rigging system is outdated, specifically the NLA editor and the lack of a robust pose library or animation layers (though they acknowledge improvements are coming).
>>
File: survey result.png (88.4 KB)

88.4 KB PNG
>>1023710
>https://survey.blender.org/feedback/2025/
As usual, the people are retarded. It doesn't matter if they add color layers if the average beginner doesn't know how to paint and texture.
They should have voted for NURBS instead.
>>
>>1023712
>Sculpting:Complaints that sculpting performance (high poly counts) is lagging behind the most popular 3D sculpting tool
That one is false, I can now get ludicrous polycounts with Vulkan (on my machine, not on a student laptop). They have worked on sculpting over the past 2 years and I recognize that.
The problem is you can't decimate the mesh after it goes over 70 million tris, it's a point of no return.
>"Sculpt Layers" and Multiresolution modifier bugs have been ignored for too long.
That's me, they finally heard my voice!
>>
>>1023712
>Artificial Intelligence (AI):A strong, distinct subset of users is vehemently opposed to Generative AI (LLMs/Image Gen) being integrated, viewing it as unethical or environmental theft. (Conversely, a smaller group wants AI tools, but the anti-AI sentiment is louder/more aggressive).
Keep in mind this survey was taken before AI fucked PC parts pricing. The anti-AI sentiment is likely louder and more aggressive now. I wanted to get 64GB RAM this year...
>>
>>
>>1023711
>CAD
Blender will never be a cad program so I think the nurbs complainers are barking up the wrong tree. You can't educate them into sanity.
>Simulation
Agreed, if there were even just a few improvements to basic sims having settings closer to real world units instead of randomly guessing numbers to get the result you want.
>Video Sequencer (VSE)
Making it actually equivalent would be out of scope but at the same time, the state of open source video editors is so bad that VSE is one of the best options
>>1023712
>Texture Painting & Baking (Major Pain Point):This was the most frequent specific complaint. Users feel this module is abandoned, outdated, and lacks a layer system (layers are constantly requested to compete with the industry standard solution).
Agreed but I rather let ucupaint cook and then integrate the good features of that.
I would like to see better brushes in the default set, we have a million sculpt brushes but almost nothing out of the box for texturing. The brush settings are incredibly clunky having to dive through the dropdown menus to find things with weird names unlike paint programs.
Also for fuck's sake have some auto-bake function like all the random paid addons that exist.
>UI/UX & Keymaps
I don't really get this one
>Rigging & Animation
Yes. There are also annoying pitfalls with how shapekeys interact with actions
>>
>>
>>1023739
> Multiresolution
I hope they can fix it, they are trying to fix it with no good results afaik, layers should come after.
>>1023740
xD
>>1023744
>CAD
They have a task to integrate OpenCASCADE (freecad)
https://projects.blender.org/blender/blender/issues/100127
Ofc nobody is working on that, you have that guy working in the exporter too
https://extensions.blender.org/add-ons/surfacepsycho/
>Texture Painting
Yes, we have 2 addons now to work with layers in the extensons platform, ucupaint and HAS paint layers, they should hire both guys and let them port that to the core, maybe to split the module too.
>>1023745
the 3d brush has been on experimental more than a year > sculpt texture paint.
>>
File: textere.png (834.1 KB)

834.1 KB PNG
How would you do this texture using nodes? I know it's a certain kind of noise but I'm new and not sure which.
>>
>>
>>
>>
File: _ Jazz2 [E__Projects_3D_Blends_Jazz2.blend] - Blender 5.0.1 12_26_2025 7_14_09 PM.png (848.8 KB)

848.8 KB PNG
I need help finding a way to be able to put image textures onto this cell shaded material. I have a near perfect cell shaded material in these pics that I don't know how to get image textures onto. Everything I've tried so far has just messed up how the texture looks in the final render. They either look more like an overlay on the material or don't match up with the shader's reactions to lighting. Please help blender bros. The closest thing that i've gotten is a different material that can display image textures, but doesn't have as much customizability overall compared to the first
https://files.catbox.moe/cd6pgg.png
https://files.catbox.moe/9kjx8y.png
>>
>>
>>
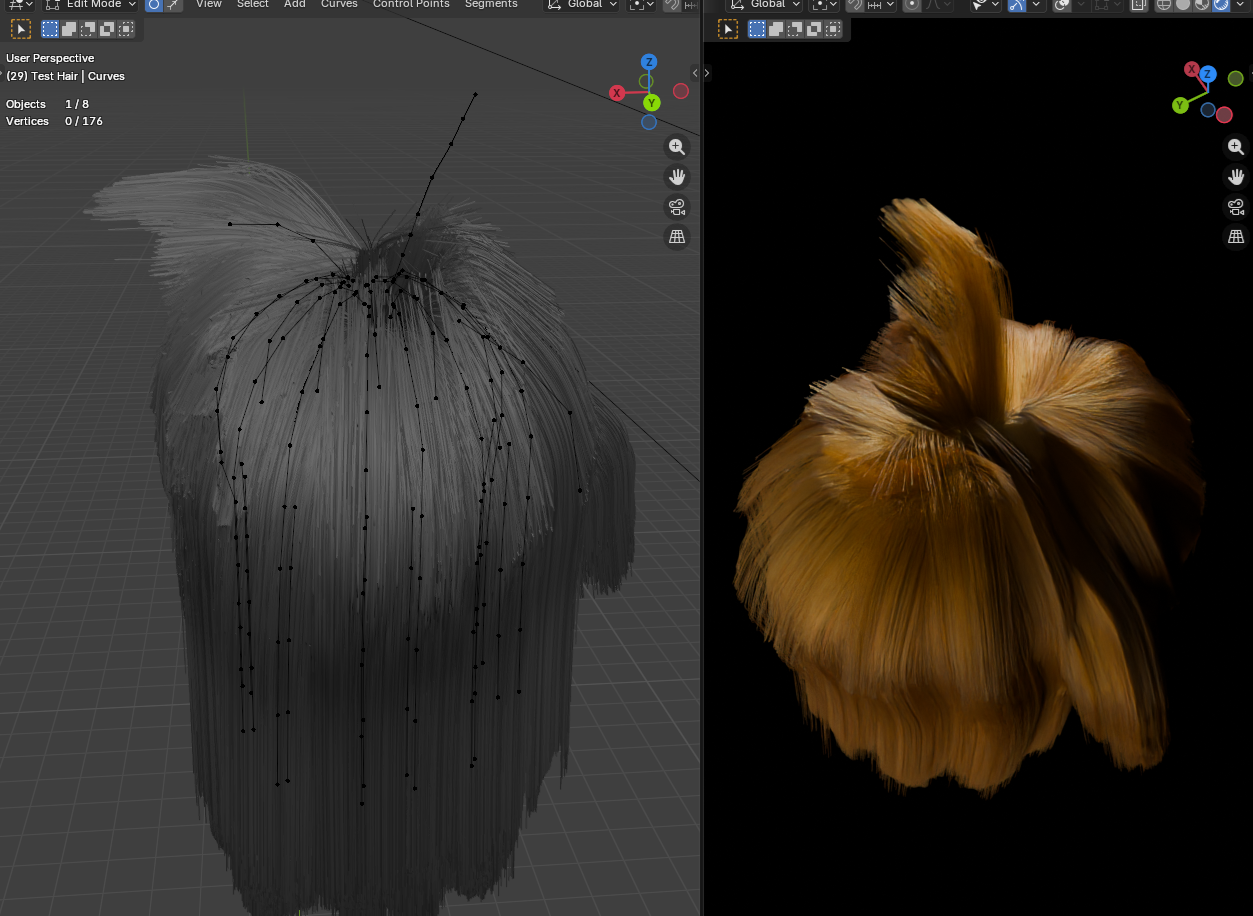
I found a way of interpolating hair that's faster than the default interpolate hair node. Faster by a lot. I can't say it's very versatile though. As in, I'm not sure it will work on a full body scale. But if you just want to put hair on a character's head, this can get the job done.
The basic idea, is to create a voronoi mesh to act as the interpolator. And then transfer the interpolated attribute from the mesh and onto a new set of points. And then converting the points into curves.
The node is so fast, it averages about 3.3ms to generate 1,000 interpolated curves. However, it scales incredibly well. For 100,000 curves, it only takes 19ms. 200,000 curves only 40ms.
The default node would be chugging at only 10,000 curves, taking 250ms. And 100,000 is 2,500ms.
While my interpolator is much faster, it's missing some functionality. I'm going to tack on a couple extra things. Might slow it down. But I suspect not by much.
>>
>>
>>
>>
>>
>>
>>1023905
Kept running into issues today. The interpolation looked bad, and I couldn't figure out why. After combing through the node group a couple dozen times, I'm about 80% sure that going full voronoi is giving bad interpolation. I should have noticed it yesterday. I could have sworn it was working fine yesterday.
But in any case, I figured out how to make it work again. But removing the dual mesh node, and keeping the delaunay triangulation. That interpolates cleanly. Because the edges are directly between the points. Where the voronoi fails, is that the cells it generates interpolates slightly differently than the edges of the triangulation. That difference is not huge, and intuitively it doesn't feel like a big deal. But the slight difference ended up mattering a huge deal.
So yeah. The extra functionality I wanted to implement has to be reconsidered. Since I was thinking in terms of voronoi cells. Now I'm forced to figure out how to do it with the triangulation. Supposing it's even possible.
>>
>>
I simply cannot get good clouds in my outdoor scene. If I use an HDRI, I lose the sky texture multiple scattering that looks amazing. if I do a plane with a noise texture, I get clouds and coverage on the ground but it looks terribly fake. if I use any form of volumetrics, I tank my viewport and increase render times tenfold. I JUST WANT NICE LOOKING CLOUDS ON A NICE SUNNY DAY
>>
>>
File: _ Jazz2 [E__Projects_3D_Blends_Jazz2.blend] - Blender 5.0.1 12_30_2025 7_20_30 PM.png (423.1 KB)

423.1 KB PNG
>>1023907
this. It doesn't work
>>
>>
>>
>>
>>1024027
I played with it a few times. Got ok results.(for a newbie) With a little more effort, I can see it producing professional looking results.
But I avoid it, because while I was trying it out, I went back to the character's mesh to change the topology. Not realizing that doing so, confuses the particle system, and causes it to rearrange all the curves. It's like some underlying indexing issue. I never learned why it technically happens. Only that you have to first detach the particles, then change the mesh, then reattach the particles. Failing that, you will destroy hours of work. So be careful. It's a simple mistake to undo, but if you have the hair hidden while you're working on the underlying mesh, you might not realize you fucked up the hair, and save that mistake. Just something to look out for.
>>
File: Volume Grid Hair 01.png (320 KB)

320 KB PNG
>>1023925
I set aside the voronoi/tiangulation idea to try something different. A volumetric approach to curve interpolation.
I'm still learning how the volume and grid nodes work, but I think I'm onto something. At least, I have a sketch of an idea. Combining an extrusion method I picked up from CGMatter's bowl of spaghetti video and my own tinkering, I'm able to actually create interpolated hair. Though it's way more messy than it should be ideally. But maybe there is a way to fix that. I'll work on it some more to see what I can do.
Understand volume and grid nodes was super confusing, until I realized a volume is like a container for grids. So when you create a volume, it automatically creates grids in the container. And then you have to use the "get named grid" node to pull the grid out of the container. And from there, you can manipulate the grid.
>>
File: Volume Grid Hair 02.png (765.4 KB)
765.4 KB PNG
>>1024043
Another angle.
As you can see, the interpolation isn't very good. Also, one of the guide curves doesn't have hair surrounding it at all. It's the curve sticking up. It's all connected to the radius somehow. I'm not quite sure.
I set the hair count to 90,000 in this image, and the whole thing only takes about 180ms.
There are only 25 guide curves. And that's probably more than I need for this basic shoulder length hair style.
>>
File: Volume Grid Hair 03.png (715.9 KB)

715.9 KB PNG
>>1024045
A technically better set up, but still not the results I'm looking for.
I realized that starting with a standard volume cube was what I wanted all along. Voxelize it, then have it sample the nearest points of the guide curves. Then using the index of the nearest points, sample the tangent of the curves. That gives you the general map for the extrusion. Perform the extrusion, and then all the curves go where they're supposed to go.
A few issues though: voxels only interpolate to their next door neighbors. I was hoping for a wider blend. A gradual blend of attributes over many voxels. But no, it doesn't work that way. At least, not to my knowledge. But what this means, is that hair closer to the scalp are interpolating pretty much perfectly. But the farther away from the scalp the hair is, the less it interpolates. This makes clumping around parent curves too obvious. By lowering the voxel resolution, it forces more wide spread blurring. But it also loses the detail of the overall shape of the hair.
Also, in order to get the extrusion to be nice and tight, it has to extrude in small increments. Larger increments cause the hair to overshoot and fly away, appearing all frizzed out and unkempt. Which mean that many more control points need to be created, which bloats and slows down the node a great deal.
If I can figure out solutions to these issues, then using volume to create hair might be the best thing ever. But if I can't figure out solutions, then I'll have to abandon the idea.
>>
File: file.png (10.4 KB)

10.4 KB PNG
I wonder if anyone has the packages for those beta versions of 4.2 back when they still had legacy EEVEE alongside the new shit one.
They dont seem have those versions archived, and while i have one of those for windows since then and treasure it greatly- i wonder if one could link the linux version, or at least the source and a retard guide to compile it.
Thanks in advance.
>>
>>
>>
>>
>>1024234
No.
There are only a few settings you need to change which don't lower image quality but give speed improvements. Something simple like rendering to a format like exr instead of png can help, caching bvh, and with lowering some of the bounce paths. After that everything is a sacrifice
>>
File: lightroom.png (620.3 KB)

620.3 KB PNG
not sure if this is the right place but I made this and just want to post it
>>
File: 1760804495798957.png (307.7 KB)

307.7 KB PNG
How do you manipulate extracted videogame models? I spent a week trying and failing because the rig bones were all over the place and I couldn't manipulate it properly. I tried building a rig anew and it again failed as if it couldn't ''fuse'' with the model.
Eventually I went into using Mixamo to establish a new rig and download the fbx there to manipulate instead, which came with its own set of problems with shoulder armor, neck bones, unified fingers etc.
I got what I wanted, I could ignore the deformities. But the question kept nagging on me.
So, how do you guys deal with extracted models?
>>
>>

>>
>>1024249
The rig will almost always be janky due to things lost in the ripping process / tools the original animator used that obviously didnt get stuffed into the game data, but it still works, it still manipulates the model.
I just modify the existing rig to be more sensible, if the bones come out super tiny, I just stretch out the ends, if they should have bone shapes, I make bone shapes for them, I'm not really sure what kinds of issues you're running into.
>>
Is there a way to swap between the color picker editors? I paint with the square but for just picking basic material colors, the circle picker is a bit more convenient
I also wish I could paste in 0-255 rgb values instead of being stuck with 0-1 or hex code
>>
>>
>>1024671
Thanks, I haven't written a script in a while but might end up writing my own. Haven't tried it yet, but I did find this picker which does some of what I want and has an on screen color picker built in which is nice
https://extensions.blender.org/add-ons/coloraide/
>>
File: lattive.png (31.1 KB)
31.1 KB PNG
I like this, but I want the same feature with add curve
>>
File: ttd.png (2.4 MB)
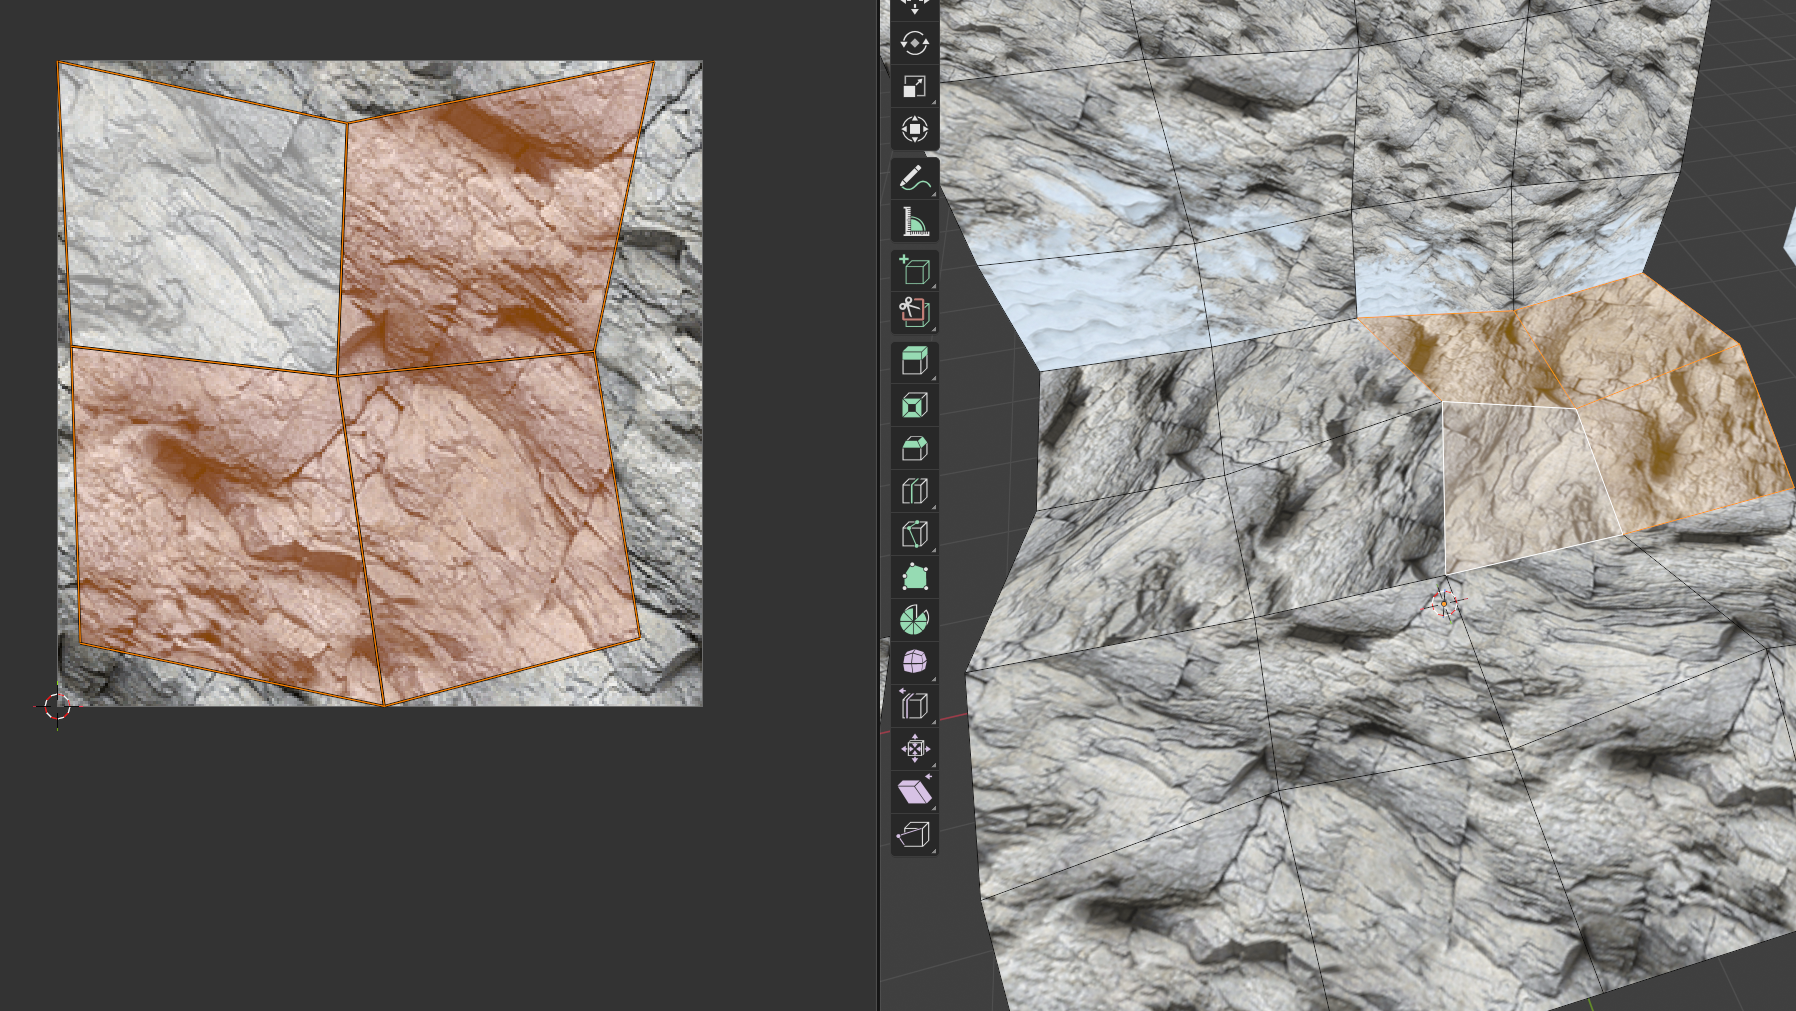
2.4 MB PNG
is there a way to easily unwrap something to fit perfectly into the UV space when it has more than one face?
the UV reset is the closest to that, but it resets each face into the UV space rather than all faces combined
manually straightening each edge is tiresome. idk how something so simple is seemingly not a feature
>>
>>
>>
File: 1744703277671542.png (933.5 KB)

933.5 KB PNG
LuxCore was looking pretty awesome for current Blender versions, until I decided to import my smooth shaded meshes (especially the low poly meshes) and realized that smooth shading literally doesn't work properly due to some kind of issue with shadow termination.
AMAZING SOFTWARE. To think I actually believed this architectural visualization engine was a viable substitute for Cycles rendering, foolish me.
>An object that I set to "smooth shading" looks like it is shaded flat in shadow penumbras
>This artifact is called "terminator problem".
>Solution: Unfortunately there is no real solution. You can only try to mitigate the effect by subdividing the geometry further and/or increase the size of the light source that is causing the problem.
>>
>>
File: lll.jpg (2.4 MB)

2.4 MB JPG
trying to figure out vertex colors within blender
the problem is that I can't use soft light and multiply at the same time in a single Color Attribute. multiply works for darkening areas, soft light for lighting of course, and overlay sort of balances the two but fucks up the dark areas
I don't get how they did it on 5th gen and 6th gen consoles. they could clearly do both of these things at the same time on a single mesh, as evidenced by the Vagrant Story model viewer (pic) and all sorts of games on noclip.website, but I can't replicate it myself
I'd rather keep the node setup as simple as possible, since messing with vertex colors is already finnicky enough as is. I'm hoping there's a really obvious solution I'm missing here
>>
>>
File: file.jpg (125 KB)
125 KB JPG
it's over...
https://x.com/EHuanglu/status/2014811894263996695
>>
File: fucking die.png (2.4 MB)

2.4 MB PNG
>>1024911
alright I tried going the lightmap route instead, and it's just as fucking bad
made an extreme light setup with super dark shadows and bright points, baked it out, all fine, but when it comes to applying it it's the exact same problem. setting it to Multiply only allows me to darken it, just like with a color attribute
the only way I can get around it is with a Map Range node, but that forces me to lose the color data, rendering the lightmap pointless
why is it to fucking difficult to just apply two things at the same time? all I want to do here is have my base textures, light the scene, save that lighting info as a texture and combine the two
now I get why people abandoned these bullshit methods
>>
>>
File: IMG_0412.jpg (197 KB)

197 KB JPG
How do I go about making 6th generation esc environments and models in Blender. I wanna make my own beaches
https://files.catbox.moe/c1njac.mp4
>>
>>
>>
>>
>>
>>
>>
can anyone else no longer use vertex paint to determine quad density with Quad Remesher in blender? it's a pretty important feature, would suck if it's no longer useable. usually I'd just adjust the slider on the right and it would go from red to blue
I'm using the latest version of it and blender, 1.4 and 5.0 respectively
>>
File: ffxxxx.jpg (2.5 MB)

2.5 MB JPG
>>1025123
I spent a fair bit of time trying to do this exact same thing, see >>1022841
noclip.website is your best resource for this, since you can view all of the levels in FFX directly
you can also toggle the layers to see the raw textures in the scene without lighting, browse the texture files themselves, the vertex colors etc. also use the 'show map mesh' to get an idea of how they built the level, the wireframe view sucks so ignore that for the most part
here's what I've learned:
billboards: used for light shafts, fog, fire, effects in general. often combined with vertex colors for either alpha or coloring a greyscale texture. find a level with light shafts / god rays and remove the vertex colors and you'll see it's just a flat plane, then apply vcol and you'll see how they added transparency
environment transition patches: used in all sorts games of this era, essentially you very nearly overlap a mesh and then use erase alpha with vertex coloring to make it look as if it's blending. this can be used to make it look like dirt, snow or whatever else is blending into another part of the environment. can also be used with scrolling textures to create lighting effects, like the reflected light on the wall in the first image here from Kingdom Hearts, and in the 3rd image of this from FFX (side of the boat and such). turn off vcol and find texture transitions that look unnatural, then zoom in very closely (set scroll speed to 1 with the scroll wheel) and you'll see how it works
this isn't related to FFX directly but it's important for environment work: match colors in photoshop or whatever image editor you use, to make it look like textures fit together in the same scene more naturally. you can skip the desaturate step btw: https://www.textures.com/tutorial_matchcolor
and for the fuck of it, there's some FFX models here: https://models.spriters-resource.com/playstation_2/finalfantasyx/
here's my node setups for this stuff. that's all, go nuts
>>
>>
>>
>>
>>
File: Screenshot.png (178 KB)

178 KB PNG
>>1024793
>>1024797
does anyone know if there is a way to easily have these circles overlap eachother? I have installed the addon mentioned in this post and I found the sort option somewhat useful (if i have to resort to manually resizing/rotating everything) but after trying all of the buttons nothing immediately seemed to do what I want